Thursday, May 23, 2013

Danville Plumber - TOILET BASICS: UNDERSTANDING TOILET STYLES, WATER USAGE, AND HOW THEY WORK! - Guaranteed Plumbing Co Danville - 925.820.2090

American Standard Toilet


Whether you’re in the beginning stages of a bathroom remodel or you just need to replace your outdated or inefficient toilet, you may be wandering the aisles of a home store or browsing your computer wondering things like:

Which toilet is right for my bathroom?
What does gpf mean?
Do I need a one or two piece toilet?
Can I save money on my water bill?
And what’s the difference between all these toilets anyway?
Never fear!  We’re here to give you a two part easy-to-understand series in toilet basics, including types, sizes, and flushing systems, so that you leave with a clearer understanding of what you really want and need in a toilet!
Types of Toilets and How they Work:
Gravity Fed: The most common type of toilet is the gravity-fed model, which uses, well, gravity.  It relies on the weight of the water and the head pressure (how high the water is in the tank) to flush.  A gravity fed toilet has free-standing water sitting in the tank.
Pressure-Assist : The lesser used pressure-assist toilet depends on air pressure within a cylindrical vessel, inside the toilet tank.  Air inside the vessel forces a vigorous, rapid flush.
Dual Flush: A dual flush toilet is a type of gravity fed toilet.  Dual-flush toilets give users two flush options: tilt the handle up for liquid waste to save water, or push the handle down for a standard flush.  Dual-flush toilets often meet the HET (high efficiency toilet) criteria of averaging 1.28 gallons per flush or less (an average based on one high flush and two low flushes).
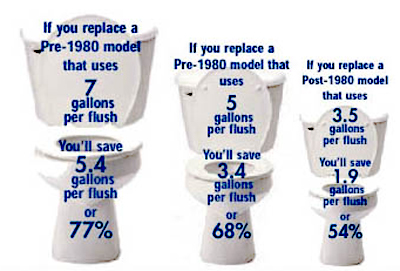
Toilet Technology and Water Use:  Recent toilet technology has allowed toilets to use less water than ever.  That term that keeps popping up in toilet descriptions, gpf, stands for gallons of water per flush, and is a measure to help identify water usage.  Toilets manufactured before 1980, not uncommon in many homes that haven’t gone through a bathroom remodel, usually need 5 to 7 gallons of water per flush (gpf), and toilets from the 1980s to 90s typically use 3.5 gpf.  In 1992, the U.S. government mandated that toilets use no more than 1.6 gpf, changing modern design and manufacturing.
It’s easy to see why replacing older toilets with the newer models can result in significant water and sewer savings.  Replacing a 3.5- or 5-gpf toilet with a 1.6-gpf toilet can save about 9,740 to 17,300 gallons of water per year.  Meaning today’s high-efficiency toilets use less water than ever, yet outperform many of the older, water-guzzling ones.

source: bath plumbing, consumer news

http://www.guaranteedplumbingco.com


Tuesday, May 21, 2013

Danville Plumber - Low-Flow Toilets: Pros, Cons - Different Brands on the Market - Guaranteed Plumbing Co Danville - 925.820.2090


The average person flushes the toilet six times a day. The average low-flow toilet uses 1.6 gallons of water per flush versus older technology toilets which used up to 7 gallons per flush. Water conservation like this not only helps the environment, but it can also help your wallet as well by consistently lowering your water bill each month. Though low-flow toilets can cost a bit more to install initially, the economic benefits over time are quickly making low-flow toilets an industry standard.
Despite their many obvious advantages, low-flow toilets are not known for their power and can sometimes fail to flush a particularly large bundle. Though we here at Guaranteed Plumbing are happy to drive to help you with a clog, we know that you’d rather just avoid the situation altogether to begin with. 

New technology is making it possible to get powerful flushing and water conservation all in one. If you’re considering installing a low-flow toilet in your home or want to upgrade your current model, the following brands are some of the best options on the market.

1) Toto Ultra-Max: Quiet, powerful, and consumer-friendly, this toilet is easy to assemble and is known for its “three second flush.”
2) Caroma Caravelle: Featuring dual flush technology that allows a half-flush button for liquid waste and a full-flush button for solid waste. Dual flush options are quickly gaining popularity in many homes around the country. 

3) Kohler Archer One-Piece: Chic and powerful, this toilet highlights “gravity-fed” flush technology that makes it quieter than normal pressure-assisted models. Consumer Reports recently did a feature blog and video on the Kohler One-Piece.
4) Toto Drake: Has what many industry professionals consider to be the most thorough and powerful flush, leaving nothing in the bowl.
5) Kohler Purist Hatbox: For those looking for a toilet that’s a little less intrusive and a little easier on the eyes, the Kohler Hatbox is a great low-flow option. With a modern design that stays true to its name, the Hatbox is powerful while still remaining stylish.
And remember, no matter what toilet suits you best, Guaranteed Plumbing will always be there to help when something goes wrong!
source: Consumer News

http://www.guaranteedplumbingco.com
 

Thursday, May 16, 2013

San Ramon Plumber - How to Install a Kitchen Sink - Guaranteed Plumbing Co - Danville, CA


 Getting a Kitchen Sink Installed

A shiny new sink, along with a new faucet and countertop, will jazz up a kitchen as much as new flooring and appliances, and for considerably less money. These days, it isn't that difficult to install a new sink and faucet, thanks to fittings that simply screw or glue together—often without solder or torches
Sink anatomy illustration
Illustration: Gregory Nemec
The trickiest part of installing a new sink and faucet is connecting the sink's drain—the pieces between the sink's tailpiece and the waste line. Always start at the sink tailpiece and work down. This is where a swivel P-trap with a trap adapter earns its keep. It can swing side to side on two different axes and adjust up or down.

Before you head off to the store, Richard recommends drawing a "map" like the illustration here and checking the inside dismeters of the tailpiece and waste line, usually 1 ½ inches. Then, instead of buying a kit, get only the pieces you need, including Schedule 40 PVC pipe to cut and fit as needed.
laying out sink location
Photo: Keller & Keller
Mark the counter's back edge to center the sink within its cabinet.

If sink has a template, align it with the mark on the counter. Place its back edge 1 1/2 inches from and parallel to the counter. Trace around it; proceed to Step 2.

If there's no template, use 2-inch tape to outline the sink location.

Mark the center of the sink on its back lip.

Lay the sink upside down on the counter. Align the mark on the sink with the one on the counter.

Adjust the sink to leave 1 1/2 inches between its back edge and the backsplash. Be sure sink is parallel with the counter's edge.

Trace around the sink, then remove it.

Measure the width of the sink lip, subtract 1/8 inch, and mark inside the sink outline by that much.

To make the cut-out lines, connect all the marks with a straightedge. 
marking the cut lines
Photo: Keller & Keller
After using a straightedge to connect the marks, you'll end up with a rectangular outline of the sink's hole on the counter.

Round off the corners by hand to approximate the radius of the sink's corners.

Next, use a spade bit that's slightly wider than the jigsaw blade (1/2-inch bit is usually sufficient) and drill a hole inside the radius at each corner of the cut-out lines
cutting the sink opening
Photo: Keller & Keller
Lower a jigsaw blade into a front hole and saw along the cut line to back hole. Repeat on the other side.

Lay a scrap of wood a few inches longer than the cutout across the sink area. Screw through the scrap and into the cutout waste to prevent it from falling or binding the saw blade.

Cut along the front and back cut lines. Remove the cut-out piece.

Check the fit of the sink in countertop; trim the hole with the jigsaw, if necessary. 
installing a kitchen sink faucet
Photo: Keller & Keller

Set the sink upside down on a padded sawhorse or counter.

Feed the faucet's supply tubing and tailpiece through the gasket that seals the faucet to the sink and then up through the hole (or holes) in sink.

Screw the mounting nuts and washers to the underside of the sink deck.

Make sure the faucet can swing in a full arc across the sink before tightening mounting nuts. 

With the sink still upside down, pack a thick roll of plumber's putty under the strainer's lip and push it up through the sink's drain hole.

Slip the gasket, washer, and housing (if your strainer has one) onto the strainer and against the underside of sink. Dab pipe-joint compound onto its exposed threads.

Thread the locknut onto the strainer by hand, then tighten it with pliers while holding the strainer in place.

Fit the gasket onto the sink-drain tailpiece and attach it to the strainer with its slip nut. Tighten the nut by hand while holding strainer. 


 attaching a kitchen sink strainer
Photo: Keller & Keller

With sink still upside down, squeeze a bead of silicone caulk around the underside of the sink's lip.

Turn the sink upright and set it into the countertop hole.

Check that the front of the sink is parallel with the front edge of countertop. Adjust it, if necessary.

Connect the faucet to shut-off valves using acorn-head supply tubes or braided stainless steel hoses. 
connecting the drain of the sink
Photo: Keller & Keller
Assemble the trap adapter onto the sink-drain tailpiece.

Cut and dry-fit lengths of PVC pipe to connect the trap adapter to the trap and the drain elbow to the waste line. Swivel the trap or slide it on the tailpiece to fine-tune the pipes' lengths and alignment. Take the drain pieces apart.

Clean off the cut ends with a utility knife. Coat them and their mating pieces with PVC primer. Let dry.

Swab PVC cement on both ends being joined. Immediately push pieces together. Hold for 30 seconds.

Reassemble and hand-tighten all threaded connections. 
 
attaching a dishwashing drain to a kitchen sink drain
Photo: Keller & Keller

Attach the dishwasher drain line to the waste nib of the tailpiece. Tighten the hose clamp with a screwdriver.

Remove excess putty from lip of strainer.

Remove the aerator from the faucet and run the water full blast. Look for leaks at all connections along the supply and drain lines. In case of leaks, carefully tighten the nuts by one-eighth turns until the leak stops.

Make sure the sink's front edge is parallel to counter's edge. Fill the sink with water to weigh it down and hold it tight overnight as the caulk sets. 
 
source - JEFFERSON KOLLETHIS OLD HOUSE MAGAZINE

Wednesday, May 15, 2013

Danville Plumber - How to Fix a Leaky Outdoor Faucet - Guaranteed Plumbing Co. Danville


Step 1: Tighten the packing nut
If the faucet is leaking around the stem, use a wrench to tighten the packing nut under the handle. If this doesn't fix the problem, move on to the next step. (Editor's note: Use a second wrench to hold the faucet in place where it connects to the building when tightening the packing nut)

Step 2: Shut off the water supply
If the faucet is dripping from the spout, the faucet fixture will need to be removed. Shut off the water supply to the outside faucet by turning the valve handle.
 

Step 3: Remove the valve assembly
Open the faucet completely by turning the handle all the way open. Loosen the entire valve assembly by using an adjustable wrench on the section beneath the packing nut and above the spout. (Editor's note: Use a second wrench to hold the faucet in place where it connects to the building when loosening the section beneath the packing nut and above the spout, which is not shown in the video.) Remove the valve assembly.


Step 4: Remove packing nut washer or graphite string
Using a socket wrench, remove the retainer nut that attaches the faucet handle. Unscrew the packing nut with an adjustable wrench, and remove the nut by sliding it up the stem. Use a screwdriver to pry out the packing washer or graphite packing string inside the washer. 


Step 5: Replace the packing nut
Replace the old packing washer or graphite string with a new matching washer or string. Slide the packing nut back over the stem and tighten with an adjustable wrench. Replace the handle and retaining nut or screw. Tighten the retaining nut with a socket wrench or screwdriver. 


Step 6: For a leaking spout, remove the compression washer
To stop water dripping from the spout, replace the compression washer inside the valve assembly. Using a screwdriver, unscrew and remove the retaining screw. Remove the worn compression washer with a small-bladed screwdriver. 

 
Step 7: Replace the compression washer
Remove the old compression washer and replace it with a new matching washer. Replace the retaining screw, and screw the new compression washer in place with a screwdriver. 


Step 8: Re-attach the valve assembly
Open the handle of the valve completely. Re-assemble the faucet by screwing the valve assembly into the faucet fixture. Tighten the valve stem assembly with an adjustable wrench. Be sure to hold the valve with your free hand while you tighten the valve assembly. The packing nut should remain loose. (Editor's note: Use a second wrench to hold the faucet in place where it connects to the building.)


Step 9: Tighten the packing nut
Using an adjustable wrench, gently tighten the valve stem packing nut until snug. (Editor's note: Use a second wrench to hold the faucet in place where it connects to the building, which is not shown in the video.) Close the faucet valve handle and turn on the water supply to the faucet
source: http://www.renovateyourworld.com/HowTo_Library/How_to_Repair_a_Dripping_Outdoor_Faucet-Faucets-S2659.html
text by Benjamin Hardy

http://www.guaranteedplumbingco.com

Wednesday, May 8, 2013

San Ramon Plumber - How to find the leak in your shower or bathtub - Guaranteed Plumbing Co


How do you go about diagnosing a leak. Leaks let you know they exist by water appearing and pooling, soaking or staining something. It could be a ceiling below, the floor next to the bathtub or shower or even in a hallway floor outside the bathroom. While the proof does let you know that you have a leak, don't read too much into the location. I've seen ceilings get water damaged not from the bathroom directly above them, but from a bathroom above them and 50 feet on the other side of the house. Water has a funny way of running down hill and finding the path of least resistance, it can leak from one area and run all the way to another place before it shows itself.

The first rule is not to jump to conclusions. Think logically of course. Bathroom directly above water damage, could be that bathroom is the culprit, but keep an open mind don't get too narrowly focused yet you could be on a wild goose chase and you don't ever want to start tearing open walls and ceilings until you are reasonably positive you are in the right place.

Rule #2 is the mind will play tricks on you. It's very easy to associate circumstances and confirm circumstances in your mind. I can recall one particular problematic leak that the homeowner swore was related to running the shower. The ceiling was damaged directly under the shower upstairs and they connected in their minds that every time their son who took a shower after work in the afternoon it would leak, but it wouldn't leak any other time. If someone took a shower in the morning it wouldn't leak. Well it turned out it was a plumbing vent pipe unrelated to the shower that went right up next to the shower and through the roof of the house. The roof around the vent pipe was damaged but the roof was configured in a way that rain wouldn't cause much water to get into the hole, but that winter we had a big snow storm and every day after it got warm the sun in the afternoon would melt the snow that had accumulated around that vent pipe and it would leak down and run all the way down that pipe and pool in the ceiling below the bathroom. It would take it 3-4 hours and sure enough it would coincide with about an hour after their son took his afternoon shower. So be careful what you assume and what you associate, the mind will try to find ways to confirm your suspicions.

The final rule is to confirm your suspicions. You must always test your suspicions. And think about how you are testing it, make sure the way you are doing it isolates any other possibility. This is the only way to truly find the leak. You must do isolated tests of each suspicious item one at a time.

So let’s take a typical shower or bathtub with a tiled surround and either a bathtub or a fiberglass shower pan. You've got a leak of some sort showing up either outside the tub/shower and you've observed and eliminated that it isn't the kids splashing water over the side at bath time or water leaking out the shower door.

The culprits are: 

The tile surround, which could be the grout, the corners or the connection where the tile meets the tub or the shower pan.

The drain, which would be the drain itself or the overflow in the bathtub

The valve in the wall.

The plumbing connections in the walls such as the hot and cold feeds to the valve and then the connection of the valve to either the shower head or the tub filler.

So we have only 9 individual things that it could be. So that at least makes it easy. 9 Is a lot but if we are systematic we now have a list and a process to find out which one it is.

Let’s start with the drain.
Start with examining the drain itself and the area around the drain, are their any cracks is the drain loose or nice and firmly seated? Get in there and step around it, put some weight on it see if a crack shows up that you didn't see until you put some weight on it. If you see anything like that you might have your culprit right there. But like I said don't jump to conclusions we must test, test, test!

Let's isolate the plumbing that is attached to the drain. We need a rubber hose running to a water source not in the shower or bathtub (remember we need to always isolate our tests, you can't run the shower or tub valve to test the drain without running the risk of the problem is really the valve right?) Most home improvement centers will sell different types of rubber hosing by the foot. You can purchase a length of it that will be big enough to go over your vanity faucet aerator. So get your rubber hose and stick it into the drain and run the water for 15 minutes. Come back and see if you see your leak appear where ever it has always shown up. If it usually doesn't show up for an hour, wait an hour. If you see your leak, it's the plumbing attached to the drain and you are done testing. No leak, now it's time to test the drain itself, take your rubber hose out and run the water into the shower pan or tub and do your wait and check. If you get your leak it's something to do with the drain itself, or that crack you found. See how easy this is.

Now let’s say no leak yet. Well, now we know that it's not the drain or the drain plumbing let's now move onto the valve and the plumbing in the walls. If you have a leak before the valve you would have a leak all the time. So obviously we don't have leak in the hot and cold water lines attached to the valve in the wall or you would know it by the constant leak. If it's a tub, lets test the tub filler, since we know the drain is not leaking, just turn on the tub filler and fill the tub. Let it run for 15 minutes and check. If you see your leak you've got a leak between the valve and the tub filler, there is probably a copper elbow or a joint that is broken. If you didn't find your leak let's check the tub overflow while we are at it. Close the drain and fill the tub up to the overflow and let it overflow into it for 15 minutes. Find your leak? It's the overflow connection where it is attached to the tub.

Okay let's check the shower head plumbing. The shower head is connected to the valve by a copper pipe all we need to do is plug the shower outlet and turn on the valve, this will pressurize that pipe in the wall with water. To do this you will need to take off the shower head and cap the shower pipe stem with a threaded cap you can buy. Or remove the entire shower head and stem and insert a threaded pipe with a cap into the elbow in the wall. However you do it, just plug it and turn it on for 15 minutes, the pipe will be filled with water under pressure and now if you find your leak it's the connection of the valve to the shower head. 

Okay if you still haven't reproduced your leak it's pretty easy from here, you've eliminated everything else but the tile surround which by the way is usually the number 1 or number 2 most likely cause of leaks. So from here all you need to do is turn on the shower head and aim it at the walls, now this is not scientific and will not usually result in a very accurate locater of the exact spot. A better way is to take your rubber hose, hook it up to the shower head stem and hold that hose over each wall for 10-15 minutes apiece until you find your leak. This way you will know for certain exactly where it is. Examine the tile, look specifically at the grout, do you see any hairline cracking or missing grout in the area? That's usually all it takes. Press firmly is it spongy?

The final thing to do is after you think you found your leak, is to wait a day and try it again. Double check it and make it leak again. Stop now and think about it, make sure you have it positively isolated. If you do all that and you are systematic you should now have found your leak!
source: http://www.rockymountainbathrooms.com/how-to-find-a-leak-in-your-shower-or-bathtub.htm

http://www.guaranteedplumbingco.com

Tuesday, May 7, 2013

Danville Plumber - 5 Tips on Shopping for a Stainless-Steel Sink - Guaranteed Plumbing Co


5 Tips on Shopping for a Stainless-Steel Sink

From making sure it's just the right depth to, yes, checking out its soundproofing, here are five things to consider when buying a stainless-steel sink


 Stainless-Steel Kitchen Sink
Photo: Alison Rosa


Stainless steel is an obvious choice for a kitchen sink because it cleans up quickly and has a great pro look. But once you get past the key design questions—one bowl or two, undermount or overmount—you want to base your buying decision on other, less obvious factors that affect quality and value. So we canvassed the experts for their tips. Read on for five ways to see beyond a shiny surface.

Shown: 
Franke GNX11020 undermount sink


 Metal of a Stainless-Steel Kitchen Sink
Photo: Alison Rosa


You want the strong, silent type, which is characteristic—counter intuitively—of the lowest and thus best gauges. No need to lose sleep over 16- versus 18-gauge, but when you get up to 22-gauge the metal is more prone to denting and vibrating, and less able to handle a garbage disposer. High-gauge drop-ins can be especially thin around the edges, making them ill equipped to support the heavier weight of a quality faucet.


 Depth of a Stainless-Steel Kitchen Sink
Photo: Alison Rosa


Six-inch-deep basins are cheap to make, but they splash and can't hold much. A 9- or 10-inch sink, on the other hand, holds lots—a big plus when countertop space is limited. Keep in mind that an under mount ends up another inch or so lower, which could strain your back—at which point you might consider investing in a basin rack. Shape matters too. You get more volume with square corners, straight sides, and a flat bottom, but soft angles allow for easy cleaning and good drainage.


 Evaluating a Stainless-Steel Kitchen Sink
Photo: Alison Rosa

 
Look for rubbery under coatings and pads, which deaden the sound of running water and clattering silverware, and also reduce condensation in the base cabinet. If the sink sounds like a steel drum, it's either lightweight or naked—or both.


 Ingredients and Finish of a Stainless-Steel Kitchen Sink
Photo: Alison Rosa

Stainless steel is ranked to reflect its contents. You want 300 series, or about 18 percent chromium and 8 percent nickel for optimal corrosion and stain resistance. The sink should also have a lustrous satin finish, which will develop a better patina over time than matte-finish stainless steel. Tip: If the sink holds a magnet, it is not 300 series.
Drain of a Stainless-Steel Kitchen Sink
Photo: Alison Rosa
 

Some sinks come with drain assemblies and baskets, and some don't. There's location and design to consider too. Toward the back means more usable space in the base cabinet and better drainage when dishes are piled in the sink. A rear drain to the left or right—as seen here—is better yet.


By DEBORAH BALDWINTHIS OLD HOUSE MAGAZINE

Thursday, May 2, 2013

San Ramon Plumber - Drain Management - Guaranteed Plumbing Co - Danville, CA


A home’s drain system is one of the most overlooked systems in the home. It is out of sight/out of mind until there is a problem. Although it appears to simply be pipes connected together, it is actually a complex system designed to provide a seal to prevent sewer gases from entering the home, removes solid wastes and removes waste water. Unlike the toilet, the other drains typically found in the home (Kitchen, Bathrooms, Laundry Room, Mud Room) are designed to manage waste water and not solid wastes.

The home owner has the ability to control this system in many ways before having to call in professionals.

How does a drain become blocked?

·         Short term

o   Excessive amount of solid waste put down drain

o   A foreign object put down the drain that is too large to pass

o   Grease is put down the drain and settles in the trap

·         Long term

o   Biofilm and/or fungal growth in piping

o   Settling of particulate matter over time

o   Build up of materials such as food or hair

Quick Tips for the Home Owner:

Sinks or Lavatories – General

·         Do not put grease down the kitchen drain as it can solidify and cause plugging. Pour cooking grease into an empty coffee can or something similar. When it becomes full, toss it in the trash.

·         Even if you use a garbage disposal, uncooked vegetables such as carrot and potato peels, broccoli stems, corn cobs or husks, asparagus, other fibrous fruits and vegetables, are best disposed of in the compost pile or the non-recycling trash.

·         Don't wash coffee grounds, tea bags or egg shells down the sink. Remove paper and toss the rest in the compost pile or the non-recycling trash.

·         Pasta and rice may not pass through the garbage disposal -add to disposal slowly while running water. They are best disposed of in the compost pile or the non-recycling trash.

·         Minimize the organic solid wastes (ie food) that are put down the kitchen drain. Follow with water to flush the pipes.

·         Do not put materials that cannot decompose down any drain.

·         Do not allow hair to go down the lavatory drain if possible – remove from the lavatory and dispose of in the trash.

·         The performance of system can be improved by regularly applying a mixture of baking soda and vinegar or an organic type drain cleaner.

·         It is a good practice to periodically fill the sink with water and then release it to flush your piping.

·         Harsh drain cleaners are not recommended – they are poison, give off harmful fumes when used, can harm skin and eyes and can damage some types of pipes.
source:
http://www.guaranteedplumbingco.com