Easy Fix for a Leaky Toilet
Everything should be as reliable as a toilet. It's not
unusual for one to last more than 40 years with only a minimal amount of care.
But, occasionally, water will begin to leak out from under the toilet and spill
onto the floor, which can lead to serious water damage. But this type of leak
is easy to diagnose and fix, even if you've never attempted a plumbing repair.
The leak is usually caused when the seal under the toilet fails. Even if this
hasn't happened to one of your toilets yet, this "Home Care" is for
you. You'll learn how to install a new wax gasket to create a watertight seal
between the toilet and the closet flange and install a new flexible
water-supply tube.
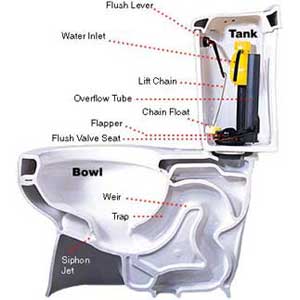
Finding the Problem
Water pooling around the base of the toilet is a good indication that the wax
seal has failed. But in some cases the problem lies elsewhere. Soak up the
water from the floor with a sponge and dry off the toilet with a towel. Wait
until a new puddle appears on the floor, then check to make sure the water is
seeping out from under the toilet and not coming from a loose supply tube,
faulty shutoff valve, cracked tank or sweaty bowl.
If water is leaking from beneath the toilet, you might be able to stop it by
simply tightening the closet bolts that secure the toilet to the floor. Use a
putty knife or slotted screwdriver to pry off the caps that are covering the
bolts. Then use a wrench to alternately tighten each bolt, a little at a time.
Be careful not to apply too much pressure; you can crack the toilet's base.
If you're lucky, the leak will stop. If tightening the bolts doesn't help,
you'll have to remove the toilet and replace the wax gasket.
Removing The Toilet
The first step is to turn off the water at the shutoff valve, which is usually
located behind the toilet, or in the basement or crawl space directly below it.
Turn the handle all the way in a clockwise direction.
Remove the tank lid, flush the toilet and hold down the handle to drain as much
water as possible from the tank. Use a sponge to get up the remaining water in
the tank; a small paper cup will help you remove any water left in the bowl.
Next, disconnect the water-supply tube by loosening the compression nut on the
shutoff valve (step 1). Pry the caps from the closet bolts, then use a wrench
to remove the nuts (step 2). If either bolt spins as you turn the nut, hold the
top of the bolt with needle nose pliers.
Grab the rim of the bowl directly below the seat hinges, and gently rock the
toilet back and forth to break the wax seal. Lift the toilet off the floor
(step 3) and lay it on a blanket or piece of cardboard. Use a narrow putty
knife to scrape off the old wax gasket from the bottom of the toilet and from
the closet flange in the floor (step 4).
Check the condition of the flange to make sure it isn't cracked or bent. After
we scraped off the wax, we discovered that a large piece of the flange had
broken off. If this happens, you can replace the entire flange (no easy task),
install a full replacement flange or fill in the missing piece with a repair
strap
To install the curved metal strap, first loosen the two screws that secure the
flange to the floor. Insert a new closet bolt into the slot in the strap, then
slide the strap under the flange (step 5). Tighten the flange screws to lock
the strap in place. Install the remaining closet bolt in the flange. If the
bolts won't stand upright, pack a little wax from the old gasket around the
base of each one.
Take a new wax gasket and set it down on the closet flange, making sure it's
perfectly centered (step 6). Most wax gaskets are simply a ring of solid wax,
but we used Harvey's Bol-Wax No. 5 (about $5). This one has wax surrounding a
core of soft urethane foam, and it easily conforms to the flange and toilet to
create a superior seal.
Replacing The Toilet
If the toilet is fitted with an old chrome-plated copper supply tube, consider
replacing it with a new flexible one made of stainless steel-enmeshed polymer.
It makes the installation a whole lot easier, and it will virtually last
forever. We installed a 12-in.-long Fluidmaster supply tube (about $5); other
lengths are available ranging from about 8 to 24 in.
Apply a light coating of pipe-joint compound to the fitting at each end of the
supply tube, then tighten one end onto the fill-valve shank protruding from the
bottom of the toilet tank (step 7).
You're now ready to set the toilet back in place. Grip the bowl near the seat
hinges, lift up the toilet and walk it over to the flange. Set the toilet down
onto the wax gasket, using the closet bolts as guides. Slip the washers over
the bolts and thread on the nuts. However, before tightening them, press down
on the rim of the bowl with all your weight to compress the gasket (step 8).
Check to make sure the toilet tank is parallel with the back wall. Alternately
tighten each closet bolt until both feel snug. Then, press down on the bowl
again and tighten the nuts a little more. Continue in this manner until the
nuts no longer feel loose after you press down on the toilet. Again, be careful
not to exert too much pressure with the wrench or you'll crack the toilet. Use
a hacksaw to cut the closet bolts nearly flush with the nuts (step 9), then
snap on the bolt caps.
Your final step is to tighten the loose end of the water-supply tube to the
shutoff valve (step 10). Open up the valve and flush the toilet several times.
If a leak occurs, press down on the bowl and tighten the nuts a little more. If
it isn't leaking, use the toilet for a couple of weeks, then pry off the bolt caps
and retighten the nuts. The toilet will often settle after several uses.
The Caulk Question
There's a long-standing debate in the plumbing world over whether you should
caulk around the base of a toilet. Most plumbers don't because they're
concerned that the caulk would conceal any leaks. However, in some
municipalities, the local building code requires homeowners to caulk around the
toilet to keep bacteria from growing in the joint.
Check with your building department for the code requirement in your town. If
you do decide to caulk, be sure to use a high-quality, mildew proof
tub-and-tile caulk.
Step by Step
1. Disconnect the supply tube from the shutoff valve using a wrench. Be sure
the valve is closed and the toilet is drained.
2. Pry off the rounded caps that cover the closet bolts, then use a wrench to
remove the hex nuts.
3. Very carefully lift the toilet by the bowl, not the tank, and set it down on
an old blanket or cardboard sheet.
4. Scrape off all of the old wax gasket from the closet flange. Note that a
section of the flange is broken off.
5. Slide a repair strap under the closet flange after loosening the screws that
secure the flange to the floor.
6. Set the new wax gasket down on the closet flange, making sure it's centered.
Note: Both closet bolts are in place.
7. Connect the new water-supply tube to the threaded fill-valve shank on the
bottom of the toilet tank.
8. Press down on the toilet bowl rim to compress the gasket. Tighten the closet
bolts, then press down again.
9. Use a close-quarter hacksaw to trim off the tops of the closet bolts.
Tighten the nuts before replacing the caps.
10. Connect the supply tube to the shutoff valve. Then open the valve, flush
the toilet and check for leaks.
http://www.guaranteedplumbingco.com
Everything should be as reliable as a toilet. It's not
unusual for one to last more than 40 years with only a minimal amount of care.
But, occasionally, water will begin to leak out from under the toilet and spill
onto the floor, which can lead to serious water damage. But this type of leak
is easy to diagnose and fix, even if you've never attempted a plumbing repair.
The leak is usually caused when the seal under the toilet fails. Even if this
hasn't happened to one of your toilets yet, this "Home Care" is for
you. You'll learn how to install a new wax gasket to create a watertight seal
between the toilet and the closet flange and install a new flexible
water-supply tube.
Finding the Problem
Water pooling around the base of the toilet is a good indication that the wax
seal has failed. But in some cases the problem lies elsewhere. Soak up the
water from the floor with a sponge and dry off the toilet with a towel. Wait
until a new puddle appears on the floor, then check to make sure the water is
seeping out from under the toilet and not coming from a loose supply tube,
faulty shutoff valve, cracked tank or sweaty bowl.
If water is leaking from beneath the toilet, you might be able to stop it by
simply tightening the closet bolts that secure the toilet to the floor. Use a
putty knife or slotted screwdriver to pry off the caps that are covering the
bolts. Then use a wrench to alternately tighten each bolt, a little at a time.
Be careful not to apply too much pressure; you can crack the toilet's base.
If you're lucky, the leak will stop. If tightening the bolts doesn't help,
you'll have to remove the toilet and replace the wax gasket.
Removing The Toilet
The first step is to turn off the water at the shutoff valve, which is usually
located behind the toilet, or in the basement or crawl space directly below it.
Turn the handle all the way in a clockwise direction.
Remove the tank lid, flush the toilet and hold down the handle to drain as much
water as possible from the tank. Use a sponge to get up the remaining water in
the tank; a small paper cup will help you remove any water left in the bowl.
Next, disconnect the water-supply tube by loosening the compression nut on the
shutoff valve (step 1). Pry the caps from the closet bolts, then use a wrench
to remove the nuts (step 2). If either bolt spins as you turn the nut, hold the
top of the bolt with needle nose pliers.
Grab the rim of the bowl directly below the seat hinges, and gently rock the
toilet back and forth to break the wax seal. Lift the toilet off the floor
(step 3) and lay it on a blanket or piece of cardboard. Use a narrow putty
knife to scrape off the old wax gasket from the bottom of the toilet and from
the closet flange in the floor (step 4).
Check the condition of the flange to make sure it isn't cracked or bent. After
we scraped off the wax, we discovered that a large piece of the flange had
broken off. If this happens, you can replace the entire flange (no easy task),
install a full replacement flange or fill in the missing piece with a repair
strap
To install the curved metal strap, first loosen the two screws that secure the
flange to the floor. Insert a new closet bolt into the slot in the strap, then
slide the strap under the flange (step 5). Tighten the flange screws to lock
the strap in place. Install the remaining closet bolt in the flange. If the
bolts won't stand upright, pack a little wax from the old gasket around the
base of each one.
Take a new wax gasket and set it down on the closet flange, making sure it's
perfectly centered (step 6). Most wax gaskets are simply a ring of solid wax,
but we used Harvey's Bol-Wax No. 5 (about $5). This one has wax surrounding a
core of soft urethane foam, and it easily conforms to the flange and toilet to
create a superior seal.
Replacing The Toilet
If the toilet is fitted with an old chrome-plated copper supply tube, consider
replacing it with a new flexible one made of stainless steel-enmeshed polymer.
It makes the installation a whole lot easier, and it will virtually last
forever. We installed a 12-in.-long Fluidmaster supply tube (about $5); other
lengths are available ranging from about 8 to 24 in.
Apply a light coating of pipe-joint compound to the fitting at each end of the
supply tube, then tighten one end onto the fill-valve shank protruding from the
bottom of the toilet tank (step 7).
You're now ready to set the toilet back in place. Grip the bowl near the seat
hinges, lift up the toilet and walk it over to the flange. Set the toilet down
onto the wax gasket, using the closet bolts as guides. Slip the washers over
the bolts and thread on the nuts. However, before tightening them, press down
on the rim of the bowl with all your weight to compress the gasket (step 8).
Check to make sure the toilet tank is parallel with the back wall. Alternately
tighten each closet bolt until both feel snug. Then, press down on the bowl
again and tighten the nuts a little more. Continue in this manner until the
nuts no longer feel loose after you press down on the toilet. Again, be careful
not to exert too much pressure with the wrench or you'll crack the toilet. Use
a hacksaw to cut the closet bolts nearly flush with the nuts (step 9), then
snap on the bolt caps.
Your final step is to tighten the loose end of the water-supply tube to the
shutoff valve (step 10). Open up the valve and flush the toilet several times.
If a leak occurs, press down on the bowl and tighten the nuts a little more. If
it isn't leaking, use the toilet for a couple of weeks, then pry off the bolt caps
and retighten the nuts. The toilet will often settle after several uses.
The Caulk Question
There's a long-standing debate in the plumbing world over whether you should
caulk around the base of a toilet. Most plumbers don't because they're
concerned that the caulk would conceal any leaks. However, in some
municipalities, the local building code requires homeowners to caulk around the
toilet to keep bacteria from growing in the joint.
Check with your building department for the code requirement in your town. If
you do decide to caulk, be sure to use a high-quality, mildew proof
tub-and-tile caulk.
Step by Step
1. Disconnect the supply tube from the shutoff valve using a wrench. Be sure
the valve is closed and the toilet is drained.
2. Pry off the rounded caps that cover the closet bolts, then use a wrench to
remove the hex nuts.
3. Very carefully lift the toilet by the bowl, not the tank, and set it down on
an old blanket or cardboard sheet.
4. Scrape off all of the old wax gasket from the closet flange. Note that a
section of the flange is broken off.
5. Slide a repair strap under the closet flange after loosening the screws that
secure the flange to the floor.
6. Set the new wax gasket down on the closet flange, making sure it's centered.
Note: Both closet bolts are in place.
7. Connect the new water-supply tube to the threaded fill-valve shank on the
bottom of the toilet tank.
8. Press down on the toilet bowl rim to compress the gasket. Tighten the closet
bolts, then press down again.
9. Use a close-quarter hacksaw to trim off the tops of the closet bolts.
Tighten the nuts before replacing the caps.
10. Connect the supply tube to the shutoff valve. Then open the valve, flush
the toilet and check for leaks.
http://www.guaranteedplumbingco.com