How to Install a Pedestal Sink
Plumbing expert Richard Trethewey makes a challenging
bathroom renovation task look easy
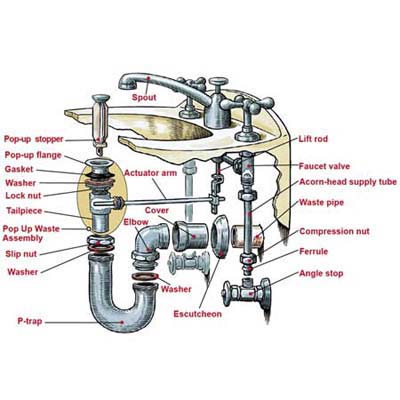
Illustration: Gregory Nemec
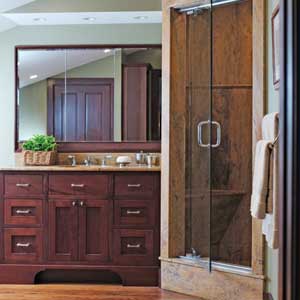
"There's something elegant about pedestal sinks,"
says This Old House plumbing and heating expert Richard Trethewey.
"And they're perfect for a half bath, where a vanity would overwhelm the
limited space."
Pedestal sinks were originally made of enameled cast iron, but by 1915 manufacturers began fabricating them from vitreous china, a glass-like porcelain. For all their stylish attributes, pedestal sinks present some installation challenges.
"This is the graduate school of do-it-yourself projects," Trethewey says. Drain and supply pipes must be roughed in at the right height. Completed pipe work has to look neat. And looming at every turn is the dreaded "tink," the sound porcelain makes when a fastener is tightened too much - and the china breaks.
Trethewey often gets calls from homeowners who've been stymied by some critical step in the process. "You must measure, measure, measure," he counsels. "Don't rely on the manufacturer's instruction sheet."
•First choose your
sink, thenhire a plumber to rough in a new waste pipe. "More often than
not, the exisiting waste pipe is too low to install the trap, which fits inside
the pedestal," Richard says.
•While the wall is open, install blocking, a horizontal 2x that's screwed between the studs at basin height, beneath the palster or drywall. Blocking provides a solid anchor for the lag screws holding the sink against the wall.
•Sinks do not come with fasteners. Have lag screws and washers on hand before undertaking this project.
•Some steps require four hands. If you try to do everything by yourself, you may see hundreds of dollars' worth of porcelain topple and smash to the floor.
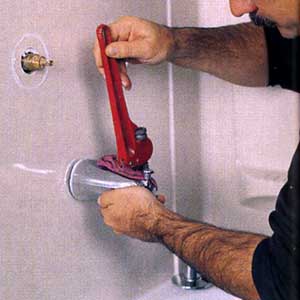
Step 1: Prep the rough plumbing, Part I
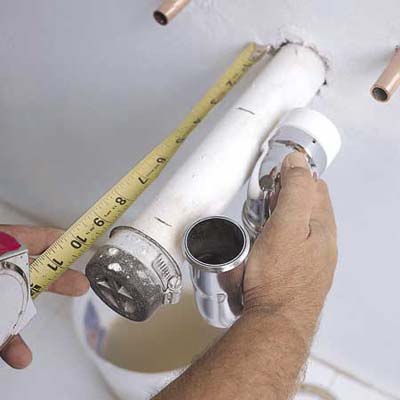
Photo: David Carmack
Shut off the main water supply and drain the hot and cold
lines into a bucket.
At the sink location, place a bucket under the copper supply lines and, with a compact tubing cutter, shear them both off about 2 inches from the wall.
Tighten the cutter slightly after each turn around the tube to avoid distorting the soft copper.
Find the distance from the center of the basin's drain to the wall. (On new sinks, this dimension is supplied with the instructions.)
Measure out from the wall and mark this distance on the PVC waste pipe.
Step 2: Prep the rough plumbing, Part II

Photos by: David Carmack
Hold the P-trap, fitted with its elbow, alongside the pipe,
with the trap's vertical end centered on the mark.
Now mark the pipe where the PVC shoulder joins the elbow.
Using a hacksaw, cut the waste pipe at this mark. To help ensure a square cut, hold the saw parallel to the wall and do not apply downward pressure.
Now mark the pipe where the PVC shoulder joins the elbow.
Using a hacksaw, cut the waste pipe at this mark. To help ensure a square cut, hold the saw parallel to the wall and do not apply downward pressure.
Step 3: Solder the supply lines
Gently ream the inside edges of the copper supply lines with a pocketknife or
the triangular blade on a tubing cutter. This removes the burr left by the
tubing cutter.Polish the ends of the supply lines with sandpaper until the copper is shiny. Coat the line with flux. Polish and flux the inside of the angle stops and slip them, with their escutcheons, over the supply lines.
Light the propane torch and apply its bright blue inner flame to the stop, at the spot where the supply line ends. Hold the tip of lead-free solder against the copper tubing where it joins the stop, on the side opposite the flame.
When the solder starts to melt, turn off the torch and run the solder around the joint. After it cools slightly, wipe with a damp rag to smooth the exposed solder and remove any flux, which corrodes copper.
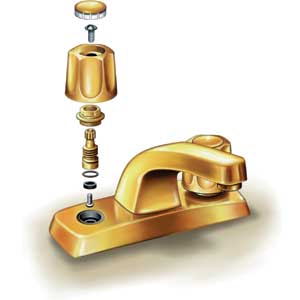
Step 4: Install a pop-up drain
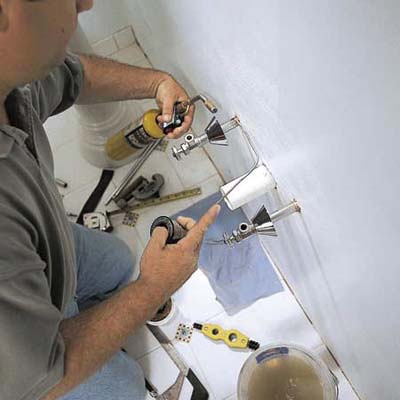
Photo: David Carmack
Roll a wad of plumber's putty into a¾-inch-wide rope and
wrap it around the pop-up drain, underneath its flange.
Wipe the basin's drain hole clean and drop the pop-up drain through it.
On the underside of the basin, slide a gasket and washer onto the drain. Thread the nut onto the drain and hand tighten. Using a wrench or water-pump pliers, finish tightening with a quarter-turn.
Wipe the basin's drain hole clean and drop the pop-up drain through it.
On the underside of the basin, slide a gasket and washer onto the drain. Thread the nut onto the drain and hand tighten. Using a wrench or water-pump pliers, finish tightening with a quarter-turn.
Step 5: Level the basin
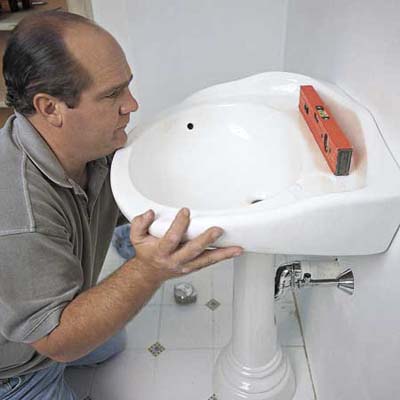
Photo: David Carmack
Set the pedestal on the floor so it lines up with the
PVC waste pipe and its center is about the same distance from the wall as the
center of the basin's drain (see step 1).
Place the basin on the pedestal and against the wall. Fine-tune the pedestal placement and level the basin side-to-side.
Make a mark on the wall through each of the mounting holes at the back of the basin. This shows where to drill later for the lag screws that hold the basin to the wall.
Place the basin on the pedestal and against the wall. Fine-tune the pedestal placement and level the basin side-to-side.
Make a mark on the wall through each of the mounting holes at the back of the basin. This shows where to drill later for the lag screws that hold the basin to the wall.
Keeping the pedestal and basin together, move them away from
the wall. Have a helper hold the sink steady so it doesn't tip over.
Test-fit the P-trap and elbow assembly to the PVC waste pipe, and measure the distance from the floor to the top of the trap's open vertical end. Mark the same distance up from the floor on the tailpiece of the pop-up waste assembly.
Test-fit the P-trap and elbow assembly to the PVC waste pipe, and measure the distance from the floor to the top of the trap's open vertical end. Mark the same distance up from the floor on the tailpiece of the pop-up waste assembly.
Step 6: Attach the trap
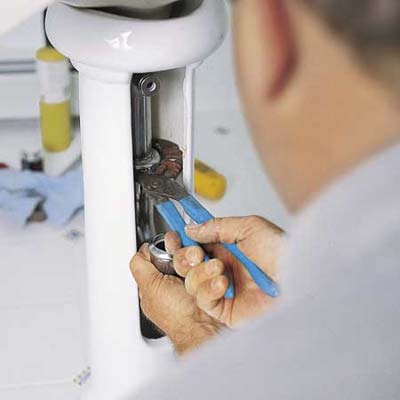
Photo: David Carmack
Remove the elbow and place the P-trap's slip-nut and washer over the pop-up waste's tailpiece. Cover the P-trap's threads with pipe dope or plumber's tape and slide the trap up to the mark you just made on the tailpiece. Thread the nut on to the trap by hand.
Tighten the nut with a wrench or water-pump pliers, taking care not to mar the chrome finish.
Drill into the wall at the lag screw locations marked in step 5
Step 7: Mount the faucet
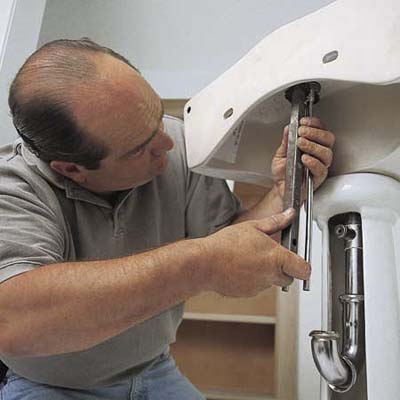
Photo: David Carmack
Place O-rings (if provided) or rings of plumber's putty
under the flanges of the faucet's valves and spout, and insert them into their
respective holes on the basin deck.
Slide a gasket and thread a nut onto the underside of each of the fittings. Tighten the nuts by hand, then finish tightening with a basin wrench. Carefully move the sink back against the wall.
Line up the mounting holes in the back of the basin with the holes in the wall. Insert the lag screws with their fender washers through the mounting holes and tighten with a socket wrench while checking for level.
Step 8: Make final connections
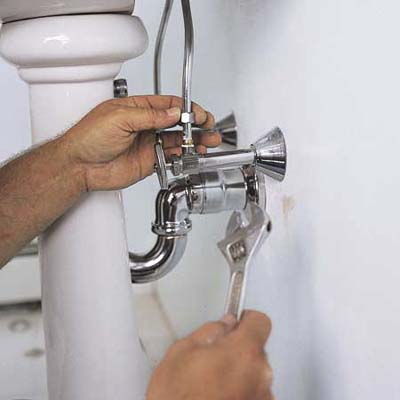
Photo: David Carmack
Place a washer between the elbow and trap, dope the threads,
and tighten the nut by hand. Finish tightening with water-pump pliers.
Measure the distance between one angle stop and its faucet valve, add an inch, and cut a chromed supply tube to length with a tubing cutter.
Slip two compression nuts and a ferrule over the cut end. First, tighten one nut to the stop with a wrench, then bend (don't kink) the supply tube slightly—first to the side, then up—so its acorn head fits into the valve's outlet.
Tighten the head to the valve with the second nut. Repeat for the other angle stop and faucet.
With the lift rod in the up position attach the pop-up stopper to the actuator arm, then secure the arm to the lift rod with the screw provided.
Slide the escutcheon and cover over the PVC waste pipe.
BY THOMAS BAKERTHIS OLD HOUSE MAGAZINE