Wednesday, April 24, 2013

San Ramon Plumber - Learn to make faucet repairs and get your sinks in tip-top shape - Guaranteed Plumbing Co Danville


Let's face it, faucets wear out. They simply don't last forever, and eventually a working faucet morphs into a leaky faucet. The remedy is to fix it or replace it, it's that simple.


What's funny about broken faucets is that they often still work despite their leaky tendencies. In the last year alone I've had to replace our kitchen faucet, a faucet in the master bathroom and a faucet handle in one of our showers...

Average time living with these faucet repairs on the to-do list? I didn't keep track, but it was easily months. Countertops collected water around the handles and a shower required a little extra gripping power to turn on and off for the better part of a year.

What made me finally tackle each faucet repair is the same theme I always talk about - If I can fix it myself cheaply and stress free, the satisfaction for getting it done will far outweigh the nuisance of making the repair. It's a nice reward.

Swapping out a rusting kitchen faucet with a stuck cartridge (read: cemented) inside so the granite counters stopped turning dark from seeping water made us feel better about our kitchen more than we ever had.

And while a new kitchen faucet cost more than a few dollars, the new handle in the shower cost less than a few dollars. Oh...how nice it is to operate a working handle each morning.

Further, I once made a faucet repair in our guest bathroom that didn't cost anything. We had to reverse the hot and cold on the faucet, and as entertaining as it was to hear our guests yell "Yeow!" when they thought they were getting into a warm shower (but got cold instead), this easy and free repair was well worth it..

So ask yourself - is there a faucet or sink needing repair in your home right now? If so, I want to help you take a look and see how you can make your own repairs (most often the case), or if it's time to remove it, hold a memorial service, and move on to shiny new faucet. I'll help you through it all.

Common Sink and Faucet Repair Projects

Aside from faucet repairs, there are a few other parts to any one sink that might also be calling for your attention.

Accessories like broken sink sprayers adorn many a kitchen sinks, and down below, a garbage disposal repair can come about out of the blue, exactly when you need to use it the most. Both of these require only basic skills and knowledge to repair and will bring a smile to your face when you're done.

In basements and garages, wall-mounted sinks get loose over time and need repairing - not the much more expensive alternative of replacing.

Or, perhaps you want to install something new in the realm of faucets. Outdoor water faucets are a popular summer project; for example, helping homeowners water gardens more easily or rinse off after a day in the pool.


Tuesday, April 23, 2013

Danville Plumber - Rocking toilet and loose toilet seat fix - Guaranteed Plumbing Co - Danville


Rocking toilet and loose toilet seat fix
 

Sitting down to do your business in the bathroom, you don’t usually expect your toilet to be loose and rock back and forth. In fact, nothing feels less secure in this room in terms of sustaining an embarrassing injury. Fortunately, a rocking toilet isn’t going to cause you much personal harm, but a loose, wobbly toilet is still something you should fix since it can eventually lead to a water leak and damage your home. Most of us haven’t ever removed a loose toilet before or even have a clue how it’s done. So, fixing a rocking toilet by say, replacing or repairing a broken toilet flange may seem daunting. Don’t despair, if you tackle this problem with a mindset that all you are doing is fixing your wobbly toilet, then you can focus on that task and accomplish something you never thought imaginable in a do it yourself project. So without further ado, let’s see what may be causing your toilet to be loose and how to fix it.

Broken toilet flange causes rocking toilet Your wobbly toilet may be moving because the mounting bolts that hold it down have nothing to grab onto anymore. You might think your loose toilet bowl is held down to the floor by a couple bolts. While this is true, you should know that the bolts don’t go directly to the floor. Instead, they secure to a toilet flange. Think of this flange as a strong metal or plastic ring. It’s this piece that is bolted to the floor, and also sometimes secured to the drain pipe called a “bend”, which is made of sturdy iron.. Now, you might get lucky and just be able to tighten down these bolts, but if the bowl is rocking or as been for a while, it’s time to take a look at the flange underneath. In this how-to article, you’ll need to start with lifting up your loose toilet from the floor. This isn’t so bad, just be sure to turn off the water supply valve first. Second, give it a flush to drain the bowl water. And third, undo the bolts holding down the toilet. After lifting up you’ll be able to see the broken toilet flange that caused the unsturdy toilet.. You have two choices here: Fix the broken or cracked toilet flange or replace the broken flange altogether.

Fix broken toilet flange – this is usually the more popular choice mainly because it is easier and can really do the trick if your broken toilet flange is iron or metal. The part you’ll need is an adapter called a super flange or spanner flange (see here). This is a semi-circle piece that fits over or underneath your broken toilet bowl flange. It’s job is to provide a new hole for the mounting bolts to hug onto. Pick one of these up (or two if you discover that both sides of your toilet flange are broken), using the previous link or visit your local hardware store. Follow the directions, and your rocking toilet will be solid again.

Replace broken toilet flange – you may be one of the lucky ones who finds that their broken toilet flange is beyond repair (e.g. is cracked or split into several pieces), or that it is old and corroded. Again, this isn’t a terribly difficult task. A new toilet flange will give you years of solid toilet mounting. Assuming again that you’re now looking at your broken toilet flange, you can remove it by unscrewing the bolts (should be three or four depending on the model) that hold it to the floor. In older, vintage homes, you may not have any bolts holding it down as it was secured with lead (molten when poured in around the bend pipe). If this is the case, you’ll need to use a chisel and hammer to break the iron flange out of position. Be very careful not to damage the main pipe, called a “bend”. After removing the broken iron flange, simply place in your new toilet flange. Models with rubber gaskets (seals) and brass rings will be the best here. Just make sure the flange is flush tight with the top of the floor, otherwise your toilet will wobble. Follow the easy instructions that come with your product, being sure to tighten each of the four bolts a little at a time so the rubber gasket goes down evenly around the bend pipe.

Don’t forget that whenever you lift up your toilet, you’ll be breaking the wax seal that keeps water from leaking. Simply clean off the old one and insert a new one. Or better yet, replace with a a wax free seal for cleaner, better installation.

Loose or broken closet bolt making toilet wobble As probably the easiest fix, your loose toilet may simply be due to your loose toilet mounting bolts needing to be tightened. Simply remove the small plastic bolt caps at the base of your toilet (they will be on each side, and can be pried off with a small screwdriver). You’ll see a nut, and it should be unmovable with your fingers. If either of these nuts is moving, tighten them down with a socket wrench. No need to be as tight as your muscles can muster, since the material your toilet is made from can crack under too much strain.

If these bolts are actually broken, however, you’ll need to replace them. The bolts can be purchased by themselves, so don’t feel like you need to buy a whole toilet flange repair kit. Just remove the old bolts and insert the new ones. The best kind will be made from brass.To do this correctly, you will need to lift the toilet from the floor, so you will need to purchase a new wax seal to replace the one you’re breaking apart by removing the toilet. This will be a good time to inspect your toilet flange too.

Poor install can cause a toilet to wiggle Your loose toilet troubles could be related to the way your toilet was last installed. This can happen if you have your bathroom floor redone, and the level or height of the floor changed. If so, check that they didn’t shim the toilet to raise it up. This is not a solid install and can easily lead to a toilet that moves when you sit down over a short time. Follow the instructions for replacing a broken toilet flange. You may have to carve out some of the tile or other flooring around the edge of the drain hole so that you can place a new flange down into the hole since the old flange may have been positioned higher for the old floor.

As with any do it yourself project, if fixing a loose toilet seems complicated and you wish to hire a plumber, at least review this article so that when the plumber explains the problem you’ll understand more what he’s doing. You can even inspect that it’s done right and ask educated questions so that your rocking toilet doesn’t return any time soon!
source: http://homerepairgeek.com/toilet-repair/loose-toilet-fix.html

Thursday, April 18, 2013

Danville Plumbing - How to Install a Toilet - Guaranteed Plumbing Co - Danville

anatomy of a toilet illustration
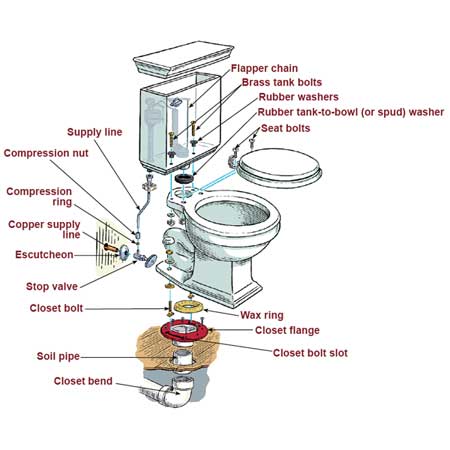
Illustration: Gregory Nemec


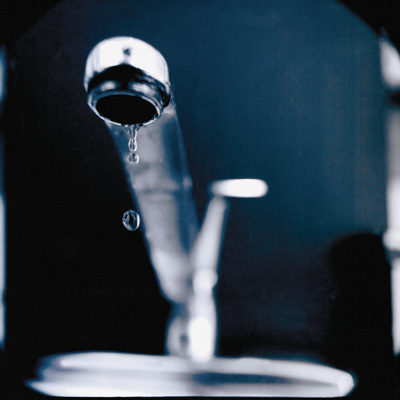
If your trusty toilet has developed cracks or leaks, uses far too much water per flush, or is simply a shade of baby blue not seen in 20 years, it may be time to replace it. You might consider this a good time to put in a call to the plumber, but it can be all in a day’s work for a reasonably handy do-it-yourselfer. It’s not for the weak, since toilets are heavy and unwieldy, but if you have a strong back (or a sturdy assistant) you can save yourself the cost of a house call by installing it yourself.

Here, we asked This Old House plumbing and heating expert Richard Trethewey to show how to install a new toilet. The time required varies, but give yourself half a day if you’ve got a lot of experience with plumbing jobs, and a full day if you’re a novice.
Stuff a rag into the soil pipe to block sewer gas and prevent hardware from falling in.

Check that the hole in the floor is large enough to accommodate the closet flange up to its collar. If the hole needs to be enlarged, trace around the flange's base with a pencil, then cut away the excess flooring with a jigsaw. Don’t cut any joists. 

installing the tank of the toilet

Dry-fit the soil pipe into the closet bend. Place the flange over the soil pipe, then measure the gap between the bottom of the flange's collar and the finish floor.

Remove the soil pipe and use a handsaw to trim it to the measurement in the previous step. Remove burrs by scraping the cut edge with a utility knife. 

installing a toilet

Dry-fit the flange to the soil pipe, and the soil pipe to the closet bend to ensure the flange's collar rests on the floor.
Wipe PVC primer on the inside of the closet bend and on the outside of one end of the soil pipe. Apply PVC cement to those same surfaces and immediately twist the soil pipe into the closet bend.

Prime and apply cement to the free end of the soil pipe and the inside of the closet flange. Twist and press the flange onto the soil pipe until the collar is seated on the floor.

Rotate the collar until its slots are positioned to the right and left of the hole. (The closet bolts, which will be inserted into the slots, must line up parallel to the wall behind the tank.)

Secure the collar to the floor with stainless steel screws long enough to bite into the subfloor.

TIP: When gluing a fixed-collar PVC flange, align the bolt slots quickly before the cement sets.
Shut off the bathroom's water-supply valve.

Place a bucket beneath the supply line, then sever the line with a tubing cutter. Leave about 1 inch of pipe to attach the stop valve and escutcheon. Allow the pipe to drain.

Remove the valve's handle and stem. (Heat from soldering may damage the stem's plastic washers.)

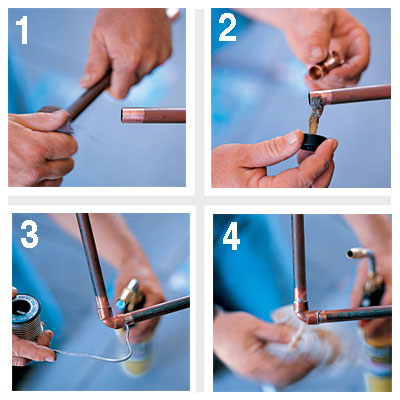
Dry the pipe inside and out with a rag. Clean the inside and outside of the pipe and the inside of the valve's inlet using a wire-brush pipe cleaner. Apply flux to both areas.

Slip the escutcheon over the supply line, followed by the stop valve; the valve's outlet should point upward.

Heat the supply line stop valve joint with a propane torch. Once the joint is hot enough to melt the solder, remove the flame and run the solder around the joint. When a drop of solder appears at the bottom, the joint is filled.
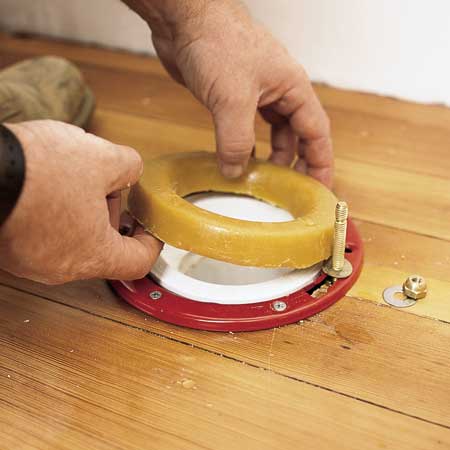
Insert the long brass closet bolts, threaded-end up, into the flange collar's slots. Slip a brass washer over each.

Gently press the wax ring, flat-side down, over the flange.

Lift the toilet bowl over the flange, align the holes in its base with the closet bolts, and lower the base onto the ring.

Without twisting or rocking, press the bowl down onto the wax ring until the bowl's base rests on the floor. If the floor is uneven, shim the bowl with stainless steel washers.

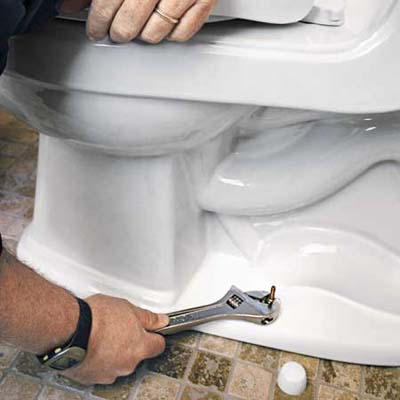
Slip a nylon washer over each bolt, then hand-thread the nuts. Tighten the nuts with a wrench one quarter turn at a time, alternating between the two. Stop when the wrench meets firm resistance; overtightening will crack the bowl.

With a hacksaw, trim the closet bolts at a point two threads above the top of the nut. Snap the plastic bolt covers into place.

*Begin with this step is replacing an existing toilet or a faulty wax seal.
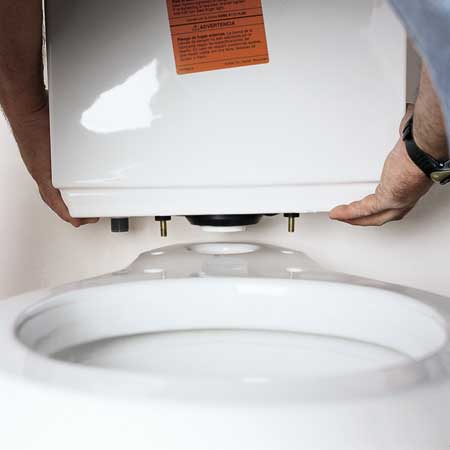
Make sure the large-diameter rubber tank-to-bowl (or spud) washer on the outside of the tank's bottom is firmly seated.

Fit the small-diameter rubber tank washers into the small tank holes from the inside of the tank, then insert the tank bolts.

Gently lower the tank onto the back of the bowl, guiding the ends of the tank bolts into the holes. 

Richard Trethewey installing the toilet supply line

Slip a nylon washer onto each bolt, then hand-thread the nuts.

Holding each bolt head in place with a screwdriver, hand-tighten the nuts, alternating from nut to nut and checking repeatedly to make sure the tank is level. Overtightening will crack the porcelain.

Connect the tank's handle to the flapper chain.
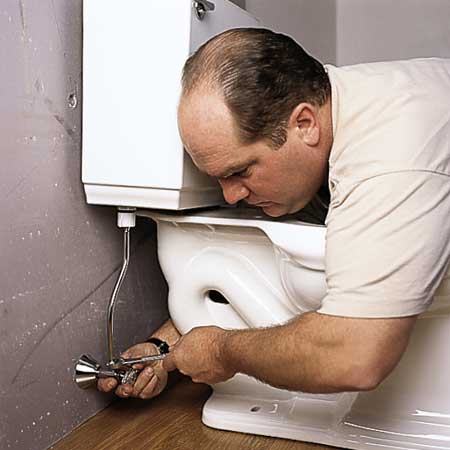
Using a tubing bender, curve the supply line to fit between the stop-valve outlet and the tank-supply fitting. Then hold the pipe, flared-end-up, between these two points and mark it half an inch below the outlet. This will leave enough line to sit inside the outlet.

Cut the supply line at the mark made above, using a tubing cutter.

Slip the plastic nut, compression nut, and compression ring (in that order) onto the supply line. Add a thin coat of Teflon paste to the valve's outlet threads, then seat the line in the outlet, and fit the compression ring.

Hand-tighten the supply line's plastic nut under the tank. Then tighten the compression nut with a wrench
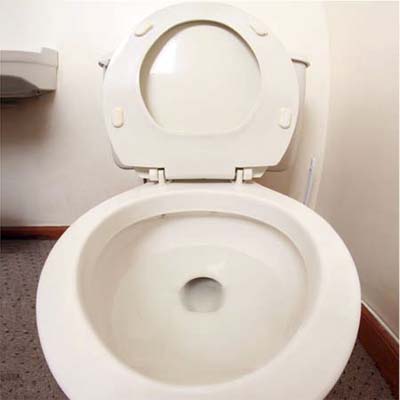
Position the seat assembly over the bowl, then insert the plastic bolts through the seat back and the bowl's seat holes; tighten the nuts by hand. 

Toilet

Turn on the main supply line, open the stop valve, and allow the tank to fill. Flush six times. Check for leaks.

by Scott Gibson

Wednesday, April 17, 2013

Plumbing San Ramon - Bar Sinks - What you should look for - Guaranteed Plumbing Co - Danville


There are now a wide variety of options for bar sinks - they range from the smaller space-saving sinks to the commercial-size ones (those that have many bays). To make it easier for you to make the decision, you must think about the available space you have and the amount and quality of entertainment that you will do in your home bar.

As a matter of fact, before designing your bar space, you would need to foresee how much entertainment you will probably do, the number of guests that you will welcome at a time, and the distance that separates your kitchen and your bar space.

Bar Sinks for Small Parties

For instance, if you will throw one party a month, and host small number of guests each time (less than 20), then you would likely need a sink that would be good for quick washing of glasses, rinsing of blenders and mixers, and so on. For these tasks, a small drop-in type of sink might be enough, or a stainless steel single-bay type might even save you some space. It may also be best for you to have the sink mounted in the counter that is underneath the bar as it is the most convenient location. One bay type sinks usually have side drain boards and back splash boards, and is very easy to install. In addition, a stainless steel type that is of restaurant quality will last a longer time and can be a good investment.

Bar Sinks for Big Parties

On the other hand, if you plan to host more frequent and larger parties, you would want to think about reserving bar space and opting for a 2 or even 3 bay commercial sink. Making frequent and long trips to your kitchen for cleaning and washing of glasses and other bar accessories can not only be disruptive to your guests, but can also take you away from being able to entertain them. Wandering through the crowd frequently with trays of glasses can also be distracting and can potentially lead to undesirable accidents. Larger 3 bay sinks can accommodate glassware preparation, cleaning, rinsing and drying all in the same place. These models also are equipped with back splashes, swivel faucets, and side drain boards which are most convenient for party hosts. Also, they are quite simple to install. Aside from these benefits, these large sinks are usually adjustable so that they perfectly fit into your bar space, wherever you install it (against the wall or under the bar). You would only need to leave the right size opening on your under bar counter tops, slide the assembled unit in, and connect the water supply and plumbing drains. Of course, best results can expectedly be achieved if you let a professional do it for you.

Thus, choosing the right bar sink for your home should not be done carelessly depending on what you feel like. You should make sure that it matches your bar design style and has just the right functionality.


http://www.guaranteedplumbingco.com

Tuesday, April 16, 2013

Danville Plumbing - Things You Should Know About Your Home Sump Pump - Guaranteed Plumbing Co Danville, CA


As mechanical things go, we don’t often think about the sump pump. It’s down under the house, out of sight and out of mind. In reality, your sump pump is one of the hardest working pieces of equipment in your house.
A typical submersible sump pump drains water year round, and when a rainstorm hits the  water pump works extra duty keeping your basement from flooding. Some homes  have sump pumps to aid in basement or under the house drainage.

So, here are a couple of things to consider:
Sump pumps are mechanical and will eventually fail.  Average sump pump life is 10 years. The most common reason for failure is the sump pump switch.

If your sump pump fails during a rain storm, hundreds of gallons of water can  flood your basement  in a matter of minutes. It doesn’t take much water to cause thousands of dollars in damage.

Basement flooding can ruin your furnace, water heater and other mechanical and electrical devices. According to the Gas Appliance Manufacturers Association these appliances must be replaced.

Sump pumps should be checked for proper operation a couple of times per year – pour some water into the sump pit until the submersible pump cycles. This is usually an easy process and only takes a couple of minutes.  Don’t wait for a failure during a rainstorm to find out your sump pump doesn’t work.
Again, all sump pumps eventually fail, so you should protect your home with a battery backup sump pump.  If you have a finished basement, a battery backup system is essential.

Battery backup systems range from basic to very elaborate.  My experience has been the basic systems seem to fail when you need them most.  While you don’t need to spend a fortune, you will find that for a few extra dollars you can get a good quality battery backup sump pump. These systems give you an extra measure of defense. They not only protect your belongings in case of a power failure, but automatically kick in should your primary water pump fail. 

Written by Erik Schroll


Wednesday, April 10, 2013

Orinda Plumber - You Dropped Your Cell Phone in the Toilet - Guaranteed Plumbing Co Danville


What To Do: Those fireplace tongs might come in handy for this problem, too—otherwise, you're just going to have to reach in and go fishing. "Put on your longest pair of rubber gloves and grab it," says TOH plumbing and heating contractor Richard Trethewey. If it gets stuck, a plunger can make the problem worse. "The pipe gets narrower inside the trap, and if the phone gets wedged, it's going to be a bear to get out," Richard says. If all else fails, a plumber may be able to hook it on the end of a snake. Once you've retrieved the phone, remove the battery and SIM card, dry them with a paper towel, and, if it's worth the $100 it will cost you, take the phone to an electronics repair shop, where they can open it up and dry the components inside.

How to keep this from happening to you: Lest you feel like a fool, nearly a third of the 20 phones fixed each day  are suffering from the ill effects of a spin in the loo, Don't multitask. That way, you won't lose your new iPhone. (Or offend your friends.)
source: This old house magazine
by Johs Garskof

http://www.guaranteedplumbingco.com

Tuesday, April 9, 2013

San Ramon Plumber - How to Stop a Flood in its Tracks - Guaranteed Plumbing Co Danville


 Learn what to do when pipes burst, fixtures leak, or appliances flood


Image by: Randall Enos


When pipes burst, fixtures leak, or appliances cause a flood, stop the deluge by cutting off the water at its source. Take a moment to locate all of the shutoff valves in your home so you'll be prepared for an emergency. 

Whole-house shutoff. For a home served by a well, the shutoff will be on the house side of the pressure tank. You should also cut power to the tank so it doesn't detect a phantom pressure loss and burn out trying to compensate. In a home with metered water, look for the shutoff on either side of the water meter. Remember, your meter could be located in the basement, mounted on an exterior wall, or even out near the street in a concrete "meter pit" where the household feed line meets the utility main. 

Whole-house hot-water shutoff. On your water heater there should be a valve on the hot-water outlet, which controls all of the hot water to the house. If there isn't one on yours, you or your plumber should install one. 
Toilet shutoff. Look for this inline shutoff — typically a ribbed oval handle — under the toilet tank. Sink shutoffs. These inline shutoffs usually sit just beneath the sink or within the cabinet or vanity. The one on the left is usually for the hot water, the one on the right for cold water. 

Dishwasher shutoff. Look first under the kitchen sink. Often there's a reducer coupling and shutoff valve leading to the dishwasher on the 1/2-inch hot-water sink-supply line. Not there? If you have a basement, look between the ceiling joists just below the appliance. 

Clothes washer. There should be valves where the house-supply lines meet the washer hoses. Washer hoses are notoriously weak, so always close the valves when leaving home for an extended period.

by John D. Wagner
 

Wednesday, April 3, 2013

Alamo Plumber - Skills You Need to Survive Homeownership - Solder a Copper Pipe - Guaranteed Plumbing Co Danville


how to sodder a copper pipe


Don't get caught with your toolbelt down—learn this technique and tackle any household emergency with ease

Learn to sweat a pipe properly and you can save some bucks by doing simple plumbing repairs yourself. Just make sure your joint starts with clean pipes (no water or grit inside).

1) Deburr inside the pipe ends with a reamer, then polish the outside with an emery cloth.
2) Coat both parts with flux and fit them together—wherever the flux is, the solder will flow.
3) Hold a propane torch flame on one side of the joint. When the flux bubbles, touch the solder to the other side of the joint and move the flame away. The solder will be sucked all around the fitting. The heat draws the solder toward the hottest point
4) Immediately wipe the joint with a damp rag. New joint, no sweat.


source: http://www.thisoldhouse.com/toh/photos/0,,20434090_20863283,00.html
this old house magazine


http://www.guaranteedplumbingco.com

Tuesday, April 2, 2013

Danville Plumber - Fix a Leaky Faucet - Skills You Need to Survive Homeownership - Guaranteed Plumbing Co Danville


dripping faucet


Too bad a house doesn't come with an owner's manual. And a week-long seminar where you learn what every button, switch, and wire is for. Alas, the keys to the castle come with no troubleshooting guide to dog-ear—and, we're betting, no wise master to unlock the mysteries of the place you call home.

Then again, that's what we're here for: to provide fast fix-it advice when it's time for you to do your home owning duty. Because at some point, you're going to have to know how to change out a light fixture without zapping yourself to kingdom come. Or paint a double-hung without gumming up the works. Or stem the flood when the toilet overflows. And you're going to want to do things right. The first time. 

This particular type of water torture is likely due to a failed washer inside a handle. The faucet is just the messenger.

To replace the washer, turn off the water supply valve under the sink. Stuff a rag in the drain so you don't lose parts, then take the handle apart. Pop the screw cover on top, remove the screw, and pull off the handle. Use a wrench to disassemble the stem, and line the parts up on the counter in the order they came off, so you know how it goes back together. Examine rubber parts or plastic cartridges for cracks, and take the offending piece to the hardware store for an exact replacement. Reassemble the parts you've laid out, in reverse. Then revel in the ensuing peace and quiet. 
source: http://www.thisoldhouse.com/toh/photos/0,,20434090,00.html
this old house magazine


http://www.guaranteedplumbingco.com