Wednesday, March 27, 2013

San Ramon Plumber - Cause of a Cracked Sink? - Guaranteed Plumbing Co Danville


Have you notice that a sink in one of your guest or main bathrooms has cracked even though it is 10 to 15 years old. Porcelain is a fairly brittle material; you don't need a rambunctious kid to break it. All it takes is a dropped jar of hand cream, or a blow to the countertop, or a sudden extreme temperature change from pouring scalding water into a cold sink; any of these could easily cause the crack. It might not show up immediately, either, but repeated exposure to the stresses of cold and hot water and a buildup of dirt will eventually enlarge and darken it to the point that it becomes noticeable.

This isn't an immediate problem, unless the sink is actually leaking, but cracked porcelain can't really be fixed, either. Replacing it will be easy, so I'd be inclined to get it out of there now. While you're at it, replace the faucet and both its water-supply tubes and the stop or shutoff valves under the sink. If they're as old as the sink, they're all ready for retirement.


source: http://www.thisoldhouse.com/toh/asktoh/question/0,,1547835,00.html
Richard Trethewey

Monday, March 25, 2013

Alamo Plumber - How to Clear Any Clogged Drain - Guaranteed Plumbing Co Danville


repairing a clogged drain


Roto-Rooter reports that that day after Thanksgiving is the single busiest day of the year for their service technicians. Armed with the right tools and techniques, you can easily unplug stopped-up drains without having to call in a pro. All plumbing systems develop clogs—there's no way to avoid it. We'll show you how to clear stubborn clogs in a kitchen sink, bathtub, toilet and floor drain. These proven techniques will dislodge virtually any clog. If you can't clear a clog after a few attempts, make sure you admit defeat and turn the job over to a drain-cleaning service or licensed plumber. Exerting too much force can permanently damage a pipe or fixture.

That said, specialized plumbing tools used to combat clogs are affordable, and they're available at any hardware store or home center; you can even rent some.

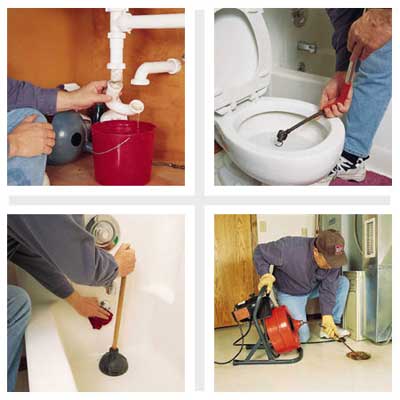
• The first tool to reach for when trouble arises is aplunger. This plumber's friend clears clogs from most fixtures, including sinks, tubs and toilets. Every homeowner should keep one handy.

• To dislodge clogs located farther down the drainpipe, use a cable auger, or plumber's snake, a long, flexible steel cable wound around a spool that's fitted with a hand crank. Cable augers are available in lengths up to 100 feet, though a 25-foot model will suffice for most any household clog.

• A closet auger is specifically made for snaking out toilets. It, too, is equipped with a hand crank, but instead of a spool, the cable is encased in a rigid shaft. The auger end is bent at a precise angle to fit through the tight curves of a toilet trap.

• For a very large clog or one that's far from the fixture, rent an electric power auger. This machine—basically a large cable auger powered by an electric motor—is very effective at cutting through virtually any clog, even tangled tree roots. Before bringing home a power auger, be sure the rental agent shows you how to safely dispense and retrieve the cable.
 
repairing a clogged sink

Most minor sink clogs can be cleared with a plunger. Partially fill the sink with water, then start plunging. Vigorously work the plunger up and down several times before quickly pulling it off the drain opening. If it's a double-bowl kitchen sink, stuff a wet rag into one drain opening while you plunge the other one. If it's a bath sink, stuff the rag into the overflow hole. In both cases, the rag helps deliver the pressure directly to the clog.

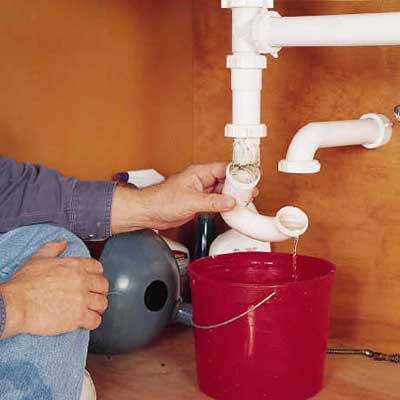
If plunging doesn't work, grab the cable auger and go to work under the sink. Remove the sink trap with a pipe wrench. The large, threaded coupling on PVC plastic traps can often be unscrewed by hand. Empty the water from the trap into a bucket, then make sure the trap isn't clogged.

 repairing a clogged sink

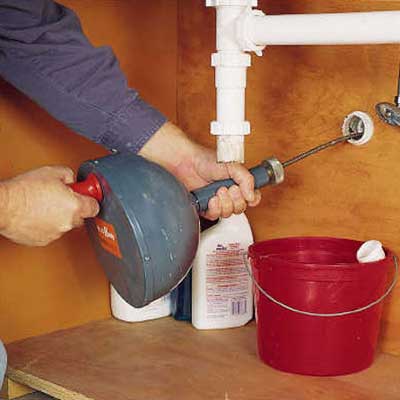
Remove the horizontal trap arm that protrudes from the stubout in the wall. Feed the cable into the stubout until you feel resistance. Pull out 18 inches of cable, then tighten the lock screw. Crank the handle in a clockwise direction and push forward at the same time to drive the cable farther into the pipe .

Pull out another 18 inches of cable and repeat the process until you break through the blockage. If the cable bogs down or catches on something, turn the crank counterclockwise and pull back on the auger.

Once the cable is clear, crank and push forward again.

Retrieve the cable and replace the trap arm and trap. Turn on the hot-water faucet to see if the sink drains properly. If it doesn't, don't worry. Debris from the busted-up clog sometimes settles into a loose blockage. Partially fill the sink with hot water and use the plunger to clear the debris. Follow up with more hot water.

 repairing a clogged tub drain

It's rare for a bathtub to suddenly become stopped up. A clog in the tub usually builds up over a period of several weeks, with the tub draining more and more slowly each day. We've all seen this happen.

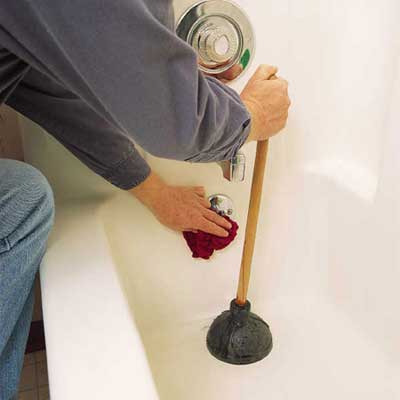
As with a sink clog, start with the plunger. First, unscrew the screen from the tub drain and use a bent wire to fish out any hair and soap scum. If there's a pop-up drain on the tub, raise the lever to the open position, then grab the stopper and pull it from the drain hole. Clean it of all hair and soap. This will often take care of things.

If not, cover the holes on the underside of the overflow plate with a wet rag and start plunging. If that doesn't clear the clog, use the cable auger.
 
repairing a clogged tub drain

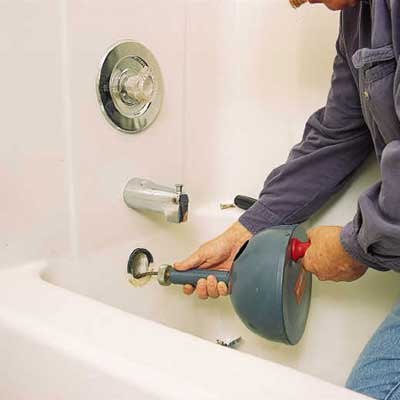
Remove the overflow plate from the end of the tub; the stopper linkage will come out with it. Feed about 30 inches of cable down the overflow tube. Push forward while turning the hand crank. You'll feel resistance almost immediately, but keep cranking on the auger until the cable passes all the way through the P-trap that lies underneath the tub.

Retrieve the cable, then run several gallons of hot water down the drain.

Finally, replace the overflow plate and screen or pop-up drain.
 
repairing a clogged toilet

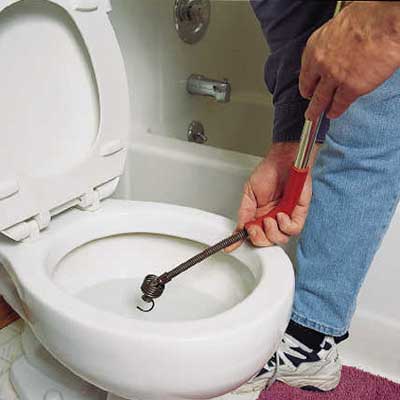
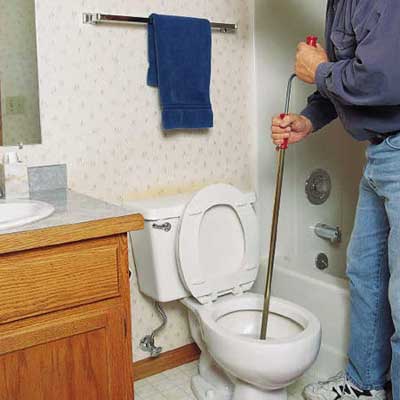
Toilet clogs almost always occur at the top of the tight, up-curving trap that's part of the fixture. In some cases, a plunger can provide enough power to clear the way, but more often than not, you'll have to use a closet auger.

Place the auger end into the bowl with its bent tip aiming up.
repairing a clogged toilet

Hold the tool shaft steady as you crank and push down on the handle. You'll feel the cable snake its way up and through the trap.

Continue cranking until you've dispensed the entire cable—about 3 feet. Retrieve the cable by simultaneously cranking and pulling up.

Flush the toilet to clear out the drainpipe. If it's still a little sluggish, run the auger through the trap twice more: once up the left side of the trap, then again up the right side. This three-pronged attack will clear any matter clinging to the sides of the trap.
repairing a clogged floor drain

In many basements, garages and laundry rooms there are floor drains that carry away wastewater from central air conditioners, washing machines, water heaters and snow-covered cars.

Over time, these drains collect large quantities of soap scum, laundry lint, sand and slimy bacteria that crystallize inside the long drainpipe. To break through these tough blockages, you'll need the extra clog-clearing muscle of an electric power auger.

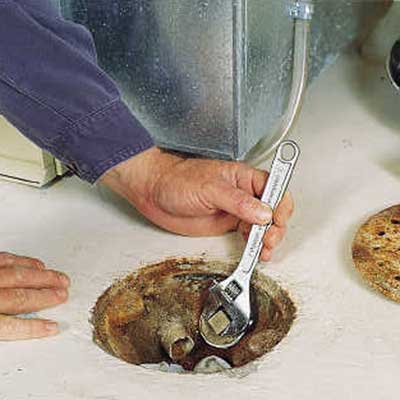
Rent a power auger with at least 50 feet of cable. Start by removing the strainer that covers the drain hole. Then, look for a clean-out plug on the side of the drain basin. Remove the plug with a wrench. That allows you to bypass the trap and feed the cable directly down the pipe. If the drain doesn't have a clean-out plug, you'll have to snake the cable through the trap; this is a somewhat more difficult approach.
 
repairing a clogged floor drain

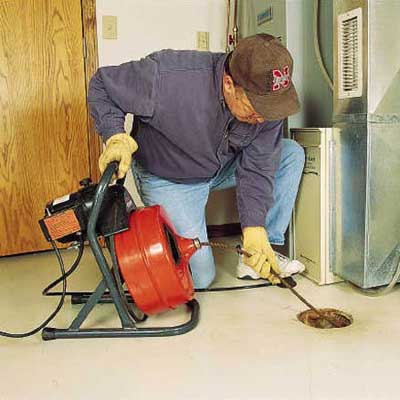
Plug in the power auger and position it near the drain. Most models are fitted with a foot-pedal switch, leaving both of your hands free to guide the cable. Feed several feet of cable down the drainpipe. Set the motor for clockwise rotation, then step on the switch to start the cable turning. Push the cable into the pipe until you feel resistance or hear the motor start to bog down. Stop the motor, reverse the rotation and back out a few feet of cable. Switch back to clockwise rotation and feed the cable farther down the pipe. Repeat this back-and-forth procedure until the clog has been cleared away.

Retrieve the cable and flush out the drainpipe by pouring several buckets of hot water down it. If the water still drains sluggishly, run about 2 feet of cable directly down the trap.

Before replacing the clean-out plug, wrap Teflon tape around its threads; this will make it easier to unscrew the plug in the future. Caution: Failure to replace the clean-out plug will allow dangerous sewer gases to seep into the house.
source: http://www.thisoldhouse.com/toh/photos/0,,20360498,00.html
by Merle Henkenius

http://www.guaranteedplumbingco.com

Wednesday, March 20, 2013

Orinda Plumber - Loosening a Stuck Nut - Guaranteed Plumbing Co Danville, CA


Loosening a Stuck Nut

How to solve a common faucet-removal problem.

Any time you replace an old faucet, you have to take off the locking nut that holds the faucet tight to the countertop. But often that nut will be frozen due to corrosion or mineral buildup from years of water seepage. Here are some nut-freeing tricks from Richard Trethewey. This Old House's plumbing and heating expert, listed in order from easiest to difficult.

1. Tighten the nut. Moving the nut in any direction is progress. Then try to loosen it using a correctly sized wrench.

2. Tap with a hammer. Jarring the nut can break its bond to the bolt. To make sure you hit the nut itself and not the surrounding threads, place a center punch on the nut and strike the punch with a hammer.

3. Apply heat. Metal expands slightly when hot, which may be enough to crack the nut free. You can do this with a hair dryer, heat gun, or propane torch. (If using an open flame within 12 inches of anything flammable, shield it with a flame-resistant fabric.) Try to turn the nut before it cools.

4. Soak the nut. If the bolt is covered with orange streaks or crumbly bits of rust, scrub them away with a wire brush and wipe the area dry. Then squirt a penetrating oil like Liquid Wrench on the threads as close to the problem as possible. Give it time to soak in. The longer you let the oil work, the better. If you have the time, try several applications over 24 hours. If the nut is encrusted with whitish lime deposits, remove what you can with a wire brush, then brush on white vinegar to dissolve what remains.

If a nut resists all these attempts to loosen it, it will have to be cut off with a hacksaw or reciprocating saw. Try making a vertical cut up through the threaded stem and nut, then crack the nut loose. 
source: http://www.thisoldhouse.com/toh/skill-builder/0,,1194710,00.html
by Harry Sawyers

http://www.guaranteedplumbingco.com

Tuesday, March 19, 2013

San Ramon Plumbing - Quieting Drainpipes - Guaranteed Plumbing Co Danville


Quieting Drainpipes

Plastic pipes are cheaper than cast iron, but they're also noisier


Cast iron drain- pipe is worth every penny in terms of its quietness, but I'm not surprised that your plumbers don't want to mess around with it. Plastic piping, whether it's PVC or ABS, is far less expensive, easier to handle, easier to cut, and easier to join. It's also noisier, no doubt about it.

While there's no way to entirely eliminate those annoying sloshing sounds, there are a few ways to reduce them. One thing to look at is where the pipes will be routed; it's always better to go through a closet wall instead of a living room wall, if you have the choice.

You can also reduce noise transmission by insulating around the pipe with sheets of sound- absorbing foams (
www.soundprooffoam.com) or with open-cell spray foam insulation (www.icynene.com). Batts of fiberglass insulation aren't dense enough to be good at soundproofing.

Another option is to mix drain materials, the way we did at the TV project in Billerica, Massachusetts. There, the drains were all plastic except for a vertical length of cast iron that ran beside the dining room wall. Tom Silva then had foam insulation sprayed all around it, just to make sure that pipe would never be heard.
source: http://www.thisoldhouse.com/toh/asktoh/question/0,,603768,00.html
by Richard Trethewey

http://www.guaranteedplumbingco.com

Thursday, March 14, 2013

San Ramon Plumber - Good bye Sweaty Toilet - Guaranteed Plumbing Co Danville


Repairing a sweaty toilet
HOLD THE valve against the cold-water line and mark where its center outlet port aligns with the vertical pipe.

Summer is the season for backyard barbecues, days at the beach and family vacations. Unfortunately, sweaty toilets are another sign of the season. In fact, every summer millions of homeowners have to deal with toilets that perspire puddles of water onto the floor.

This problem is much more than just a mild annoyance: Condensation running down the toilet can seep under the flooring, rot the plywood subfloor and soak into the floor joists. It can also stain baseboard molding, turn drywall soggy and discolor wall paint with mildew.

THE PROBLEM
When the weather turns hot and humid, there's a lot of moisture in the air. Meanwhile, the water entering the toilet tank is comparatively cold -- about 50° to 60°F. When the warm, moist air hits the cool porcelain toilet surfaces, the air condenses, turns to water and soon drips onto the floor.

Although a toilet sweats only on warm, humid days, it can drop a surprisingly large amount of water in a very short time.

Just add Heat

Several manufacturers make toilet-tank insulators they claim cure sweaty toilets, but most don't work very well. There are only two surefire ways to stop toilets from sweating. First, use an air conditioner or dehumidifier to dry out the air in the bathroom. However, this approach won't work if you don't have one of these units or don't want to run it all summer.

The second method involves installing an antisweat valve in the water-supply line leading to the toilet. The valve adds a little hot water to the line, which raises the water temperature in the toilet enough to warm up the tank and bowl. That's all it takes to keep condensation from forming, even in the most sultry weather.

Antisweat valves are sold at home centers and plumbing-supply dealers in both adjustable and preset types. Pay the extra $10 or so for an adjustable model. It allows you to regulate the water temperature and shut down the hot-water side completely when it's not needed. For our installation, we chose the Adjusto-Temp adjustable toilet valve, from Universal Rundle (Model 5025-1, $33). This valve can be installed in the bathroom, behind a wall or below the floor (if there's a crawl space or basement). Here, we show cutting the valve into a water-supply line in the basement directly beneath the toilet.

Prep Steps

Begin by shutting off the main water valve to the entire house. Then drain the hot-and cold-water lines by opening up all the sink and tub faucets and flushing all the toilets. To avoid scorching the internal components of the valve with a soldering torch, make all connections to the valve with brass compression adapters ($1.50 each). Loosely thread a 5/8 x 5/8-in. compression adapter into each of the three valve ports. Hold the valve against the horizontal cold-water pipe with the lower inlet port even with the pipe. Note where the center outlet port of the valve intersects the vertical pipe section; mark that spot on the pipe. Also mark the location of the lower inlet port on the horizontal pipe. Then use a hacksaw to cut out the pipe section.

Next, solder a 90-degree L-fitting to the vertical pipe coming down from the toilet, then extend it with a 6-in.-long stub of 1/2-in.-dia. pipe. Use lead-free solder and a MAPP gas torch. Lead-free solder is relatively hard, and MAPP gas burns hotter and works more quickly than propane does.

With the cold-water line ready for the valve, locate a nearby hot-water line and cut out a section to accept a new copper T-fitting. Splice the T-fitting into the line and assemble a short vertical riser pipe with a 90-degree L-fitting and short horizontal pipe stub. Point the stub toward the spot beneath the toilet where the valve will be installed. Solder the T- and L-connections. Add a length of pipe to reach the valve location.

Valve Installation
Lightly coat the male threads of the three brass compression adapters with a pipe joint compound (pipe dope). Thread the adapters into the valve ports and tighten them with a wrench. Slide a nut and compression ring onto each pipe end and insert the pipes into the adapters. Coat each compression ring with pipe dope and thread the nuts onto the adapters. Tighten each nut with a wrench. Turn the main water valve back on and look for leaks.

Temperature Check
A slotted screwdriver is all you need to adjust the temperature of the water flowing through the valve. Start by turning the cold-water adjustment screw counterclockwise all the way. Then turn the hot-water screw clockwise until it bottoms out. That will fully open the cold-water side and shut down the hot water. Next, flush the toilet and open the hot-water side by turning the adjustment screw counterclockwise half a revolution. After waiting an hour or so, check for any condensation on the toilet. If necessary, open up the hot-water side of the valve a little more.

Finding the optimum water temperature will likely take several flushes over a couple of days. However, once the water in the tank nears room temperature, the sweating will end.
source:http://www.thisoldhouse.com/toh/article/0,,218961,00.html
by Merle Henkenius
 

Tuesday, March 12, 2013

Plumber Orinda - Misaligned Toilet? - Guaranteed Plumbing Co Danville


Misaligned Toilet

Q: My toilet won't align with the wall. Why?

 installing a new wax ring over a closet flange to seal up a toilet bowl
Photo: David Carmack

If the toilet had been aligned before you removed it, and the flange is screwed to the floor as it should be, you just need to reposition the closet bolts that fit in the flange's slots. Remove the toilet, replace the wax ring with a new one, and see if you can adjust the location of the bolts so that they're parallel to the wall and still in the slots. If they are, when you remount the toilet it should line up with the wall just fine.

But if the flange was installed off-kilter in the first place, you'll need a stainless-steel repair ring. They sell them at home centers and hardware stores for about $5. After the new wax ring is set in place, slip the ring over the existing toilet flange, align the ring's slots parallel to the wall, and screw the ring to the floor. Now all you have to do is put the bolts in the ring slots and mount the toilet on them.
source: http://www.thisoldhouse.com/toh/asktoh/question/0,,20592004,00.html
by Richard Trethewey

http://www.guaranteedplumbingco.com

Wednesday, March 6, 2013

Orinda Plumber - How to Repair a Dripping Two-Handled Stem Faucet - Guaranteed Plumbing Co - Danville


Gold faucet
Photo: Paul Perreault
 

Droplets from a two-handled laundry-room faucet have been falling with the relentless beat of a metronome in the home of Richard Trethewey, This Old House's plumbing and heating consultant. "Most people will ignore a dripping faucet out of fear or ignorance," says Richard. If they deal with it at all, it's usually by cranking the handle so hard they risk tearing a rubber washer or cracking something and making the leak worse. At his own Second Empire house, it's more the case of the cobbler’s child whose feet go unshod.

A homeowner with a little wherewithal should be able to finish similarly simple repairs in half an hour. "Fixing a faucet drip won't solve the world's water woes," says Richard. "But it will save the finish on your enamel sink and end your Chinese water torture."
compression faucet assembly diagram
Photo: Paul Perreault
 

Most leaky compression faucets need new seat washers. Pry off the decorative cap on the handle, remove the handle screw, pull off the handle and use a crescent wrench to unscrew the packing nut. After unscrewing the stem, remove and replace the seat washer held in place by a brass screw. Pop the stem out of the packing nut and replace the O-ring, the culprit for leaky handles. Reassemble the faucet and tighten the packing nut.

If your faucet continues to leak, the seat may be pitted. Remove the stem and grind smooth the valve seat with a valve-seat dresser, a tool you temporarily screw down into the faucet.
source: This Old House Magazine
by Richard Weir
 

Tuesday, March 5, 2013

Dublin Plumber - Hands-Free Faucets - Guaranteed Plumbing Co - Danville


Photo: Nola Lopez

A novelty in public bathrooms—Look, Ma, no hands!—touchless faucets are moving into the kitchen. With pro-chef features such as high-arc swiveling necks for pot-filling, pull-down spigots for rinsing produce, and the ability to switch from automatic to manual control, these new high-tech sprayers are designed for serious KP duty.

The faucets, which turn on and off using combination motion and light sensors, help prevent the spread of germs because you never have to touch controls with grimy mitts. They also conserve water by doling it out only on demand. The technology has been around for about 20 years, but past problems with trigger-happy or unresponsive sensors, inconveniently placed temperature and stream adjusters, and the hassle of wiring the sensors have previously made hands-free impractical in kitchens.


The Parma from Danze and the Pascal from Brizo address all that with more-accurate sensors; side-mounted handles; manual overrides for when you want old-school control; and built-in battery packs, no electrical work required. Another option is Kohler's Wellspring, a hands-free-only faucet that's installed next to your existing manual one for use when rinsing a raw fish or chicken. "Just as people set separate cutting boards for meat, you can have separate faucets," says Les Patch, senior product manager for Kohler.

Like those first-generation Apple iPods, these new-fangled faucets are pricey. But as the technology evolves and more manufacturers introduce competing designs, the cost will likely come down.

Source: NATALIE RODRIGUEZTHIS OLD HOUSE MAGAZINE


Friday, March 1, 2013

Plumber Alamo - How to Stop a Flood in its Tracks - Guaranteed Plumbing Co Danville


Image by: Randall Enos


When pipes burst, fixtures leak, or appliances cause a flood, stop the deluge by cutting off the water at its source. Take a moment to locate all of the shutoff valves in your home so you'll be prepared for an emergency. Whole-house shutoff. For a home served by a well, the shutoff will be on the house side of the pressure tank. You should also cut power to the tank so it doesn't detect a phantom pressure loss and burn out trying to compensate. In a home with metered water, look for the shutoff on either side of the water meter. Remember, your meter could be located in the basement, mounted on an exterior wall, or even out near the street in a concrete "meter pit" where the household feed line meets the utility main. Whole-house hot-water shutoff. On your water heater there should be a valve on the hot-water outlet, which controls all of the hot water to the house. If there isn't one on yours, you or your plumber should install one. Toilet shutoff. Look for this inline shutoff — typically a ribbed oval handle — under the toilet tank. Sink shutoffs. These inline shutoffs usually sit just beneath the sink or within the cabinet or vanity. The one on the left is usually for the hot water, the one on the right for cold water. Dishwasher shutoff.Look first under the kitchen sink. Often there's a reducer coupling and shutoff valve leading to the dishwasher on the 1/2-inch hot-water sink-supply line. Not there? If you have a basement, look between the ceiling joists just below the appliance. Clothes washer. There should be valves where the house-supply lines meet the washer hoses. Washer hoses are notoriously weak, so always close the valves when leaving home for an extended period.
 source: http://www.thisoldhouse.com/toh/article/0,,193969,00.html
by John D. Wagner