
Antiscald valves installed in tubs and showers maintain safe
water temperatures
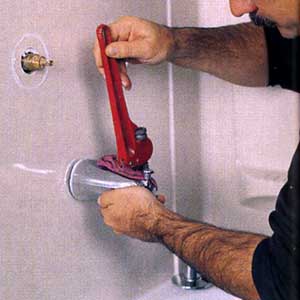
photo by Merle Henkenius
You're in the shower, doing your best imitation of a Top-40
pop star. Suddenly that warm, relaxing shower turns too hot to handle, causing
you to jump back to avoid the scorching water. The cause? Someone in the house
has flushed a toilet. If the situation sounds familiar, then you need to
install a pressure-balance valve in your shower. These pressure-balancing
devices prevent "shower shock" by automatically adjusting for
temperature fluctuations whenever water?cold or hot?is diverted from the tub or
shower, such as when someone starts up a load of laundry or flushes a toilet.
Even in an instance when the water pressure drops drastically, a
pressure-balance valve ensures that the water temperature doesn't change by
more than 3° F. Antiscald devices have been required in hospitals and nursing
homes for decades. Now, 31 states have enacted, or will do so soon, legislation
requiring pressure-balance valves in all residential remodeling and
new-construction projects. Antiscald devices are a wise investment. According
to the Consumer Product Safety Commission, each year some 200,000 Americans
suffer injuries caused by sudden changes in water temperature while they're
bathing. Everyone is in danger of getting scalded or falling as they try to
escape the hot water, but young children, the elderly and the physically
challenged suffer the most injuries. BALANCING ACT
Until recently, single-handle pressure-balance valves were the only models available; these are fine when replacing a single-handle inner valve or for a full-scale remodel, but they're not very well suited to changing over an existing two-handle faucet. To hide the empty handle holes, you have to install an enormous trim plate, which isn't particularly attractive. For that reason, we chose the Delta Monitor II (about $260), the first two-handle pressure-balance valve. But, unlike a standard two-handle faucet, which has separate hot- and cold-water handles, the right handle of the Monitor II controls water temperature and the left handle controls water volume. It features a polished-chrome-and-brass finish, and includes a matching tub spout and showerhead. For our project, we removed a two-handle, 8-in. centerspread faucet through a hole we cut in the back side of the shower wall. We also enlarged the existing handle holes in the acrylic tub surround with a sabre saw to accommodate the Monitor II. If the walls of your shower are covered with ceramic tile, enlarge the holes using either a rotary tool with a 1/8-in.-dia. carbide bit or a sabre saw with an abrasive-grit blade
Step-by-step Start by removing the existing faucet
handles, escutcheons, showerhead and tub spout. Look for a hex-head set screw
on the underside of the tub spout. Loosen it with a hex-key wrench and pull the
spout straight out. If there is no screw, the spout is threaded on. Cover it
with a cloth and twist it off counterclockwise with a pipe wrench (photo 1), or
insert a wood plunger handle in the spout itself and turn it counterclockwise.
Next, cut an opening in the back side of the plumbing wall with a drywall saw
(photo 2); gently pry out the piece and save it. Go from stud to stud (about 141/2
in. wide) and from 6 in. above the faucet handles to 8 in. below the tub spout.
Keep in mind that a larger wall opening makes it easier and safer to solder;
what's more, it's no more difficult to repair than a smaller opening. Shut off
the water to the tub and shower and cut out the old faucet with a hacksaw or
miniature tube cutter (photo 3). Next, move around to the tub side of the wall
to enlarge the two handle holes (photo 4) for the Monitor II valves. Cut the
right-hand hole to 3 1/2 in. dia. and the left-hand hole to 21/4 in. dia.,
making sure the enlarged holes measure 8 in. from center to center. Threaded
inlet and outlet ports on the Monitor II accept 1/2-in. male adapters, which
have to be soldered, or sweated, onto copper pipe. But to keep from scorching
the neoprene and nylon cartridges inside the valve, solder the adapters onto
short pipe lengths, called stubs. Allow the fittings to cool completely and
then thread the adapters into the ports. Make all the stubs at least 8 in.
long, except the one for the tub spout. It must be cut exactly to length: Set
the valve assembly into the wall openings and measure down to the hole for the
spout.
Steps 5-8 To establish the exact horizontal length of
the supply pipes that protrude from the wall, look at the markings on the black
plastic spacers covering the faucet stems. The outer mark should align with the
surface of the finished shower wall. Using these marks, cut a length of pipe
long enough to leave the threads of a male adapter protruding 3/8 in. from the
wall. Solder this assembly together with a male adapter on each end. Wrap the
threads of the adapters with Teflon tape and tighten them onto the valve with
an adjustable wrench (photo 5). Set the faucet, fitted with pipe stubs, into
the wall with the spacers extending through the wall openings. Match the
water-supply pipes with the pipe stubs and mark each cut with a pencil. Remove
the faucet, and cut the pipes and stubs to fit. Sand each pipe end with emery
cloth, then set the faucet back in place. Brush flux onto the pipe ends and
solder the connections with couplings and 45- and 90-degree elbows (photo 6).
Warning: The flame from the torch can scorch and even set fire to combustible
surfaces. You should protect the work area with a double thickness of sheet
metal or a flame-shield fabric, which is available at plumbing-supply shops.
After soldering the joints, check the marks on the plastic spacers. Reposition
the valve assembly, if necessary, then slip a 1 X 2 support block behind the
valve pipes (if one isn't already in place) and screw it to the stud at each
end. Secure the pipes to the 1 X 2 with copper straps fastened with 1 1/2-in.
screws. Finally, turn the water on and check for leaks. To trim out the faucet,
begin by removing the black plastic spacers from the control stems. Then thread
the tub spout onto its male adapter. Mount the volume trim flange and handle
onto the left-hand control stem and connect the temperature trim flange and
handle onto the right-hand stem. Now test the valve by turning on the water to
its highest temperature setting. If the water feels too hot, turn it off,
remove the handle and locate the nylon rotational limit stop on the stem. It's
marked with two arrows. Rotate the stop several notches, as shown in the manufacturer's
instructions, and replace the handle. Retest the system and readjust the limit
stop if necessary. To repair the access hole cut in the wall, screw 1 X 2s
between the wall studs, then screw the piece of drywall you removed earlier
back in place. Conceal the patch with paper tape and three or four coats of
joint compound (photo 7). Finally, on the shower side, apply a thin bead of
silicone caulk around both trim plates and the tub spout (photo 8). Allow the
silicone to cure overnight before using the tub or shower. You can now shower
comfortably knowing that the only shock you might experience is when you
actually sing on key.
Source: http://www.thisoldhouse.com/toh/article/0,,218723,00.html
by MERLE HENKENIUS
by MERLE HENKENIUS
No comments:
Post a Comment