
Summer is the season for backyard barbecues, days at the
beach and family vacations. Unfortunately, sweaty toilets are another sign of
the season. In fact, every summer millions of homeowners have to deal with
toilets that perspire puddles of water onto the floor.
This problem is much more than just a mild annoyance: Condensation running down the toilet can seep under the flooring, rot the plywood subfloor and soak into the floor joists. It can also stain baseboard molding, turn drywall soggy and discolor wall paint with mildew.
THE PROBLEM
When the weather turns hot and humid, there's a lot of moisture in the air. Meanwhile, the water entering the toilet tank is comparatively cold -- about 50° to 60°F. When the warm, moist air hits the cool porcelain toilet surfaces, the air condenses, turns to water and soon drips onto the floor.
Although a toilet sweats only on warm, humid days, it can drop a surprisingly large amount of water in a very short time.
Just add Heat
Several manufacturers make toilet-tank insulators they claim cure sweaty toilets, but most don't work very well. There are only two surefire ways to stop toilets from sweating. First, use an air conditioner or dehumidifier to dry out the air in the bathroom. However, this approach won't work if you don't have one of these units or don't want to run it all summer.
The second method involves installing an antisweat valve in the water-supply line leading to the toilet. The valve adds a little hot water to the line, which raises the water temperature in the toilet enough to warm up the tank and bowl. That's all it takes to keep condensation from forming, even in the most sultry weather.
Antisweat valves are sold at home centers and plumbing-supply dealers in both adjustable and preset types. Pay the extra $10 or so for an adjustable model. It allows you to regulate the water temperature and shut down the hot-water side completely when it's not needed. For our installation, we chose the Adjusto-Temp adjustable toilet valve, from Universal Rundle (Model 5025-1, $33). This valve can be installed in the bathroom, behind a wall or below the floor (if there's a crawl space or basement). Here, we show cutting the valve into a water-supply line in the basement directly beneath the toilet.
Prep Steps
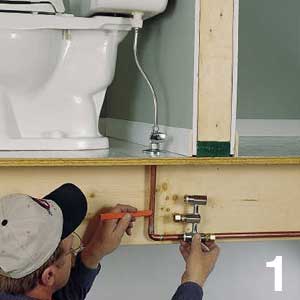
Begin by shutting off the main water valve to the entire house. Then drain the hot-and cold-water lines by opening up all the sink and tub faucets and flushing all the toilets. To avoid scorching the internal components of the valve with a soldering torch, make all connections to the valve with brass compression adapters ($1.50 each). Loosely thread a 5/8 x 5/8-in. compression adapter into each of the three valve ports. Hold the valve against the horizontal cold-water pipe with the lower inlet port even with the pipe. Note where the center outlet port of the valve intersects the vertical pipe section; mark that spot on the pipe. Also mark the location of the lower inlet port on the horizontal pipe. Then use a hacksaw to cut out the pipe section.
Next, solder a 90-degree L-fitting to the vertical pipe coming down from the toilet, then extend it with a 6-in.-long stub of 1/2-in.-dia. pipe. Use lead-free solder and a MAPP gas torch. Lead-free solder is relatively hard, and MAPP gas burns hotter and works more quickly than propane does.
With the cold-water line ready for the valve, locate a nearby hot-water line and cut out a section to accept a new copper T-fitting. Splice the T-fitting into the line and assemble a short vertical riser pipe with a 90-degree L-fitting and short horizontal pipe stub. Point the stub toward the spot beneath the toilet where the valve will be installed. Solder the T- and L-connections. Add a length of pipe to reach the valve location.
Valve Installation
Lightly coat the male threads of the three brass compression adapters with a pipe joint compound (pipe dope). Thread the adapters into the valve ports and tighten them with a wrench. Slide a nut and compression ring onto each pipe end and insert the pipes into the adapters. Coat each compression ring with pipe dope and thread the nuts onto the adapters. Tighten each nut with a wrench. Turn the main water valve back on and look for leaks.
Temperature Check
A slotted screwdriver is all you need to adjust the temperature of the water flowing through the valve. Start by turning the cold-water adjustment screw counterclockwise all the way. Then turn the hot-water screw clockwise until it bottoms out. That will fully open the cold-water side and shut down the hot water. Next, flush the toilet and open the hot-water side by turning the adjustment screw counterclockwise half a revolution. After waiting an hour or so, check for any condensation on the toilet. If necessary, open up the hot-water side of the valve a little more.
Finding the optimum water temperature will likely take several flushes over a couple of days. However, once the water in the tank nears room temperature, the sweating will end.
source:http://www.thisoldhouse.com/toh/article/0,,218961,00.html
by Merle Henkenius
More recently, however, there are accounts of workers with plumbing experience from Eastern Europe filling vacancies on building sites and a surplus of trainees trying to find jobs. plumber Columbus
ReplyDelete